
Introduction to Breakfast Cookies
In a world where mornings often feel rushed, breakfast cookies are truly a game-changer. Imagine having a delicious, satisfying breakfast that you can grab on the go—now, that's a morning win! These cookies combine wholesome ingredients with the hearty texture of traditional cookies, making it easy to fuel your day without sacrificing flavor or nutrition.
Not only are breakfast cookies a fantastic source of energy, but they also allow for creativity in the kitchen. You can mix and match ingredients like nuts, seeds, or dried fruits to suit your taste. Curious about nutritional options? Feel free to explore nut butters, natural sweeteners, or even gluten-free oats! Websites like the Whole Grains Council are great resources for understanding the health benefits of whole grains.
These tasty bites can easily serve as a meal or snack, providing a balance of carbohydrates, healthy fats, and proteins. In essence, breakfast cookies merge the best of both worlds: the simplicity of breakfast and the indulgence of cookies. So whether you’re heading to work or gearing up for an adventure, these cookies have got you covered! Ready to make your mornings sweeter? Let’s dive into the breakfast cookies recipe!
Ingredients for Breakfast Cookies
Key ingredients needed for a hearty breakfast
To create delicious and satisfying breakfast cookies, you'll need some essential ingredients that combine both flavor and nutrition. Here’s what you should have on hand:
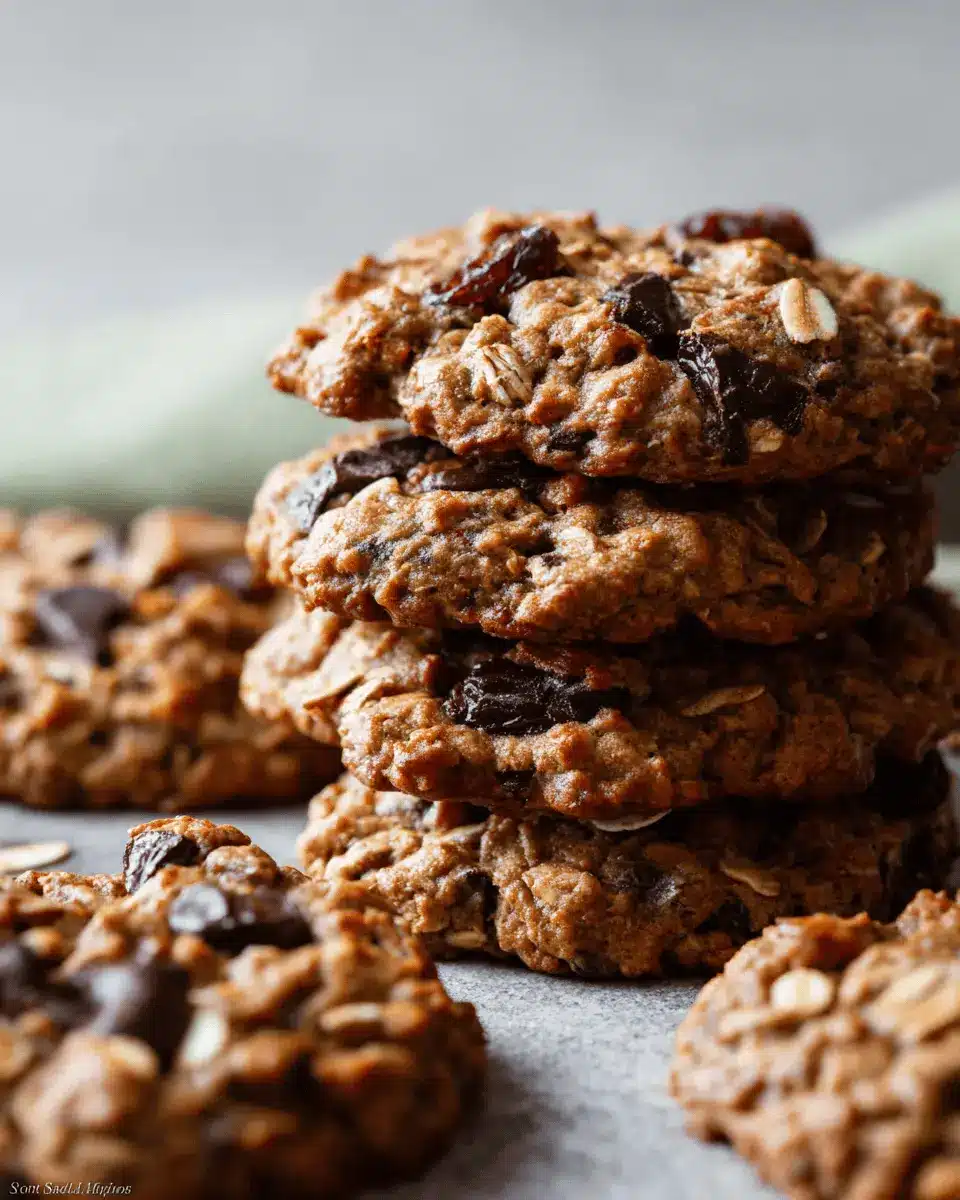
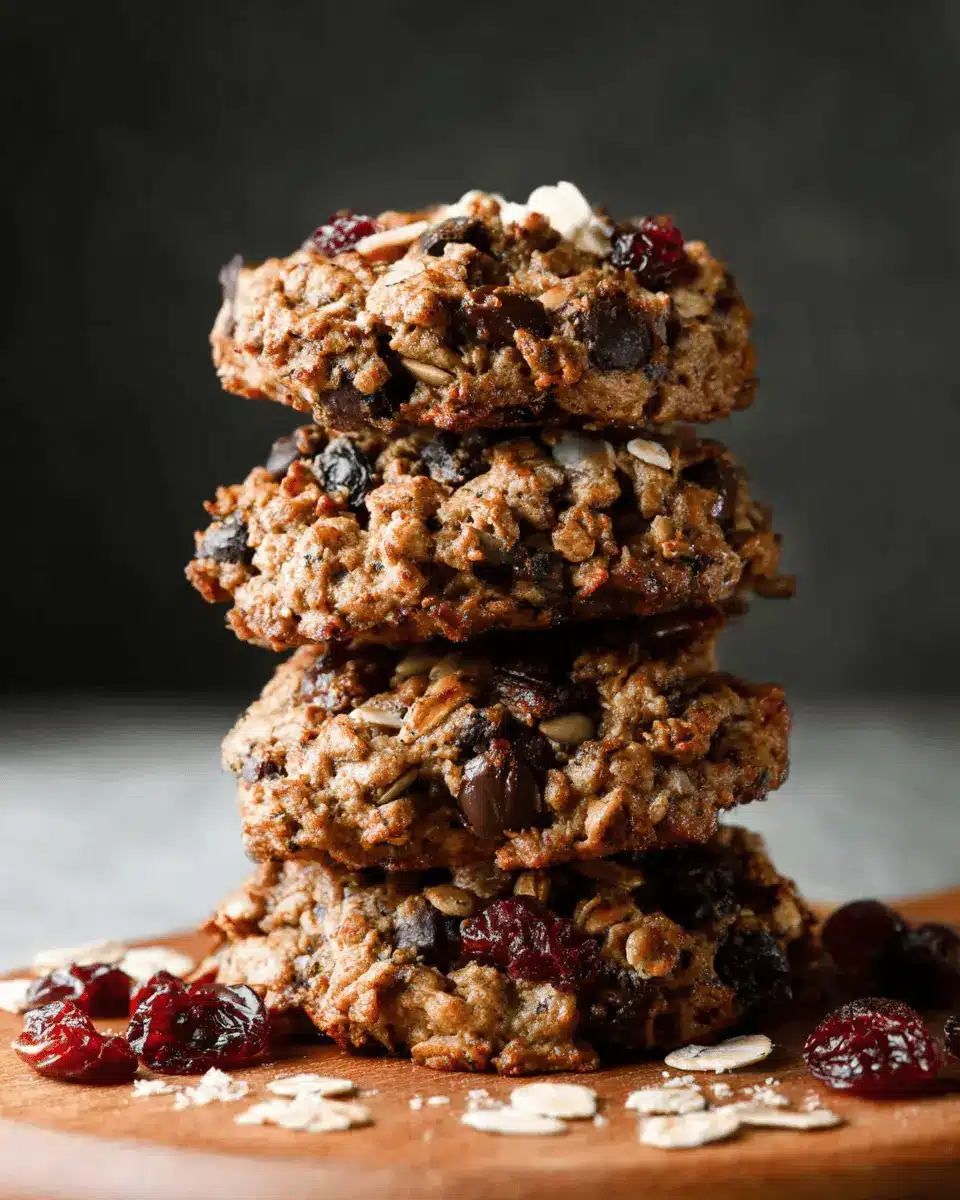
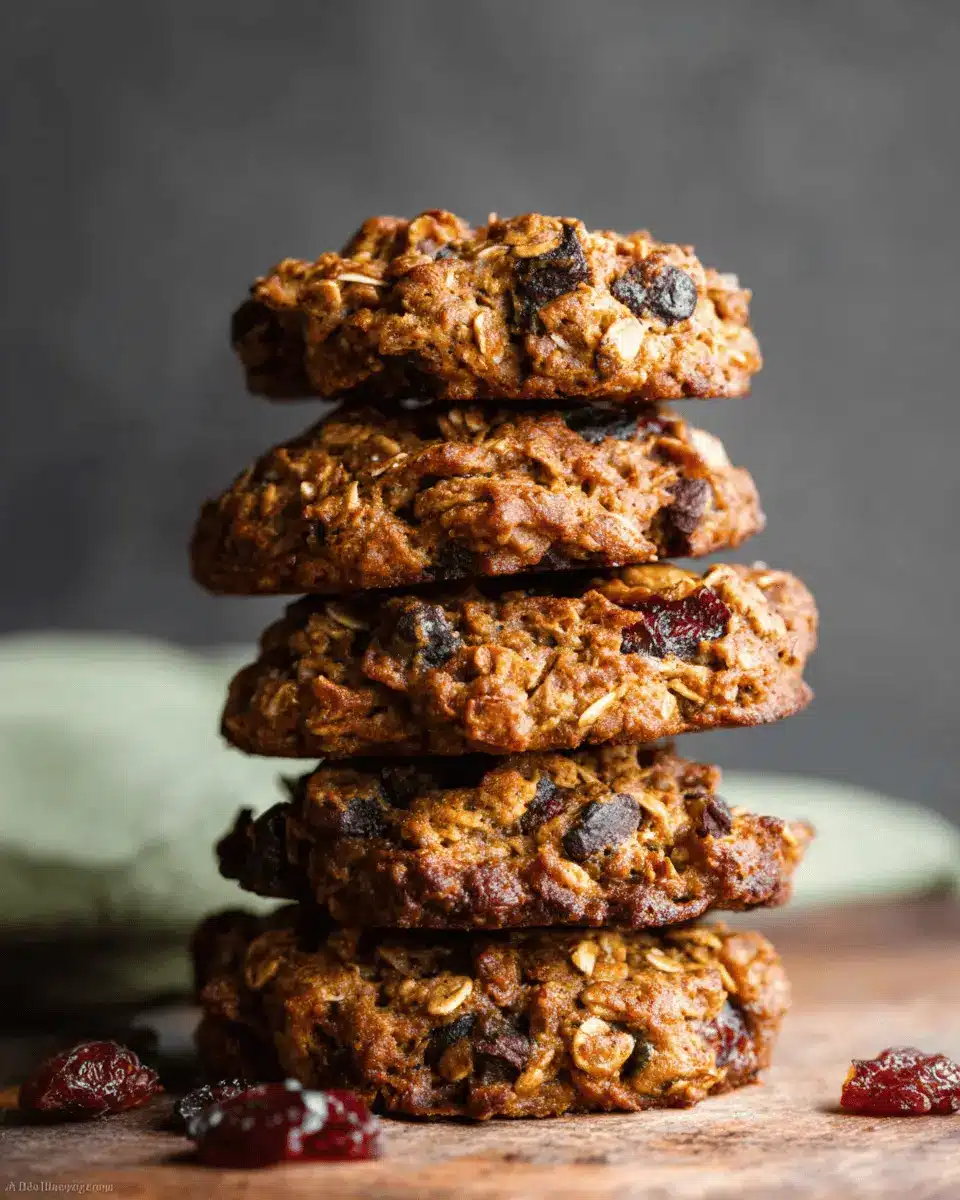
- Oats: 2 cups of quick oats or old-fashioned whole rolled oats provide a hearty base packed with fiber.
- Nut Butter: Choose 1 cup of almond, peanut, or sunflower seed butter for healthy fats and protein.
- Sweeteners: A dash of ¼ cup pure maple syrup or honey adds just the right touch of sweetness.
- Fruits: Incorporate ½ cup of mashed banana for natural sugars and moisture, along with ⅓ cup of apple butter or unsweetened applesauce for flavor.
These ingredients not only deliver a pleasant taste but also offer lasting energy to kickstart your day.
Optional ingredients for added flavor and nutrition
Want to elevate your breakfast cookies further? Consider these optional ingredients for extra flair:
- Dried Fruits: Toss in ½ cup each of dried cranberries and raisins for chewy sweetness.
- Seeds: Adding ½ cup of pepitas (pumpkin seeds) will give your cookies a nice crunch along with beneficial omega-3s.
- Flaxseed: For an additional nutritional boost, consider ¼ cup of ground flaxseed; this superfood is rich in fiber and omega-3 fatty acids.
Feel free to mix and match based on your taste preferences! These choices ensure your breakfast cookies are deliciously personalized just for you. For more insights on nutrition, check out Nutrition.gov for a wealth of information.
Step-by-step Preparation of Breakfast Cookies
Making Breakfast Cookies is a fulfilling way to kickstart your day, combining healthy ingredients into a delicious yet nutritious treat. Follow these simple steps to whip up a batch that’s sure to please!
Preheat Your Oven and Prepare Baking Sheets
First things first! Preheat your oven to 325°F (163°C). This step is crucial because it ensures your cookies bake evenly and come out perfectly fluffy. While the oven is heating up, line two large baking sheets with parchment paper or silicone mats. If you’re like me, this saves on cleanup and makes cookie removal a breeze!
Mix the Dry Ingredients Together
In a large mixing bowl, combine your dry ingredients: 2 cups of quick oats (or whole rolled oats), ½ teaspoon of salt, and 1 teaspoon of ground cinnamon. Make sure these are well mixed; you want the flavors to shine through in each bite of your Breakfast Cookies. For a bit of extra nutritional benefit, consider adding ¼ cup of ground flaxseed. This little boost adds fiber and omega-3 fatty acids that are great for your health!
Combine the Wet Ingredients
In another bowl, mix together the wet ingredients. You’ll need 1 cup of your favorite nut butter (almond, peanut, or sunflower seed), ¼ cup of pure maple syrup (or honey), ⅓ cup of apple butter, and ½ cup of mashed banana. If you’re using frozen bananas, remember to drain off excess moisture when mashing. The wet ingredients should blend into a luscious, creamy mixture that complements the dry ingredients beautifully.
Combine Wet and Dry Mixtures
Now, the fun part! Pour the wet mixture into the bowl of dry ingredients and use a sturdy spatula or an electric mixer to combine everything. The dough will be thick, so don’t be discouraged—it’s supposed to be! The mingling of oats, nut butter, and sweeteners will create a hearty cookie base. Feel free to stir in ½ cup each of dried cranberries, raisins, and pepitas. These add chewy textures and bursts of flavor to your Breakfast Cookies.
Portion and Shape the Cookies
Using a ¼ cup measuring cup, scoop out mounds of dough, placing them on the prepared baking sheets. Since these cookies won’t spread much during baking, you'll want to shape them into a cookie form with the back of a spoon. Aim for around 70g each to ensure uniform baking.
Bake to Perfection
Pop those delightful cookie mounds into your preheated oven and bake for 16–19 minutes until the edges are lightly browned. The anticipation will build as you can almost smell the delightful aroma wafting through your kitchen! Once they're done, let them cool on the baking sheets for about 10 minutes before transferring them to a wire rack. This cooling time is essential for allowing the cookies to firm up, making them easier to move without breaking.
Now that you’ve mastered the art of making Breakfast Cookies, it’s time to enjoy your creation! These cookies can be stored at room temperature or in the refrigerator for longer freshness. Perfect for a quick breakfast or a healthy snack on the go!
Variations on Breakfast Cookies
Nutty Breakfast Cookies
For a delightful twist on your breakfast cookies, consider adding a variety of nuts. Chopped almonds, walnuts, or pecans can complement the oats beautifully, enhancing both the texture and flavor. You could also include nutty protein powders for an extra boost.
Fruit-Packed Breakfast Cookies
If you're a fruit lover, try incorporating different dried fruits into your breakfast cookies. Think beyond cranberries and raisins—add chopped dried figs, apricots, or even coconut flakes for a tropical touch. Fresh fruits, like berries or apples, can also be fun to experiment with, but tend to add moisture, so keep an eye on the bake time.
These variations not only keep breakfast exciting but also make these cookies adaptable to your mood and dietary needs! For more inspiration on using fruits and nuts in your baking, check out articles from Serious Eats and Food52.
Cooking Tips and Notes for Breakfast Cookies
Best storage methods for freshness
To keep your Breakfast Cookies fresh and delicious, store them in an airtight container at room temperature for up to five days. If you want them to last longer, pop them in the fridge, and they’ll stay good for about ten days. For longer preservation, freeze the cooled cookies in a zip-top bag for up to three months. Just remember to let them thaw at room temperature before enjoying!
Tips for easy cleanup
Cleaning up after a baking session doesn’t have to be a chore. Line your baking sheets with parchment paper or silicone mats to minimize sticking and reduce the mess. Also, soak any mixing bowls or utensils right after use—this makes it easier to clean off any sticky remnants later. Embrace the process; after all, a little cookie dough on your hands is a sign of a great baking day!
Serving Suggestions for Breakfast Cookies
Pairing Ideas for a Complete Breakfast
Looking to elevate your Breakfast Cookies experience? Pair them with a side of Greek yogurt for a protein boost, or enjoy them alongside fresh fruit like berries or banana slices. A tall glass of almond milk or a vibrant green smoothie makes for a refreshing drink option. These combinations are not just nutritious; they make for a visually stunning breakfast spread, perfect for a laid-back weekend or a quick weekday morning boost.
Creative Ways to Enjoy Them as Snacks
Breakfast Cookies are also fantastic as snacks! Crumble them over your afternoon yogurt or oatmeal for added texture and flavor. They’re perfect for on-the-go, whether you pop them in your bag for work or serve them at playdates. Dip them in your favorite nut butter for a satisfying treat, or sandwich them with a thin layer of apple butter for a delightful twist. There’s no end to the delicious ways to enjoy these cookies! Need more ideas? Check out this article on healthy snacking.
Time Breakdown for Breakfast Cookies
Preparation time
Getting your ingredients together and mixing up your cookie dough will take about 10 minutes. It’s all about being quick and efficient, so you can enjoy these tasty breakfast cookies sooner!
Baking time
Pop your cookies in the oven for 16–19 minutes. You'll want to keep an eye on them to achieve that perfect golden edge.
Total time
From start to finish, you’re looking at approximately 30–35 minutes to create these delicious, nutritious breakfast treats. Perfect for a busy morning or a snack on the go!
Nutritional Facts of Breakfast Cookies
Calories per cookie
Each delightful Breakfast Cookie comes in at approximately 150 calories. Perfectly portioned, these cookies allow you to enjoy a wholesome start to your day without overindulging.
Nutritional highlights
Packed with nutritious ingredients, Breakfast Cookies offer a solid blend of health benefits:
- Fiber: With oats and fruits, expect around 3-4 grams of fiber per cookie, promoting digestive health.
- Protein: Depending on your nut butter choice, you’ll get between 5-7 grams of protein, helping keep you full and satisfied.
- Healthy Fats: From almond or peanut butter, enjoy those heart-healthy monounsaturated fats, vital for overall wellness.
For a deeper dive into the nutritional aspects of your ingredients, check out Healthline's nutrition articles. These cookies don’t just taste great; they also provide a nutritious boost to your morning routine!
FAQs about Breakfast Cookies
Can breakfast cookies be made gluten-free?
Absolutely! To craft delicious gluten-free breakfast cookies, just ensure you use certified gluten-free oats. This not only keeps the cookies safe for those with gluten sensitivities but also maintains the chewy texture and wholesome flavor you love.
How long do homemade breakfast cookies last?
When stored correctly, your homemade breakfast cookies can last up to 5 days at room temperature or about 10 days in the refrigerator. If you want to keep them fresh for longer, consider freezing them for up to 3 months. Just be sure to thaw them before enjoying!
What are good substitutions for the main ingredients?
If you’re looking to mix things up, here are some handy substitutions:
- Nut butters: Swap almond butter for coconut or sunflower seed butter.
- Sweeteners: Replace maple syrup with honey or agave nectar.
- Fruits: Use unsweetened applesauce instead of apple butter for a different flavor profile.
Ready to whip up your own tasty breakfast cookies? For more creative ideas, check out this great resource.
Conclusion on Breakfast Cookies
Embracing healthier breakfasts made easy!
Breakfast cookies are a delightful way to kickstart your day! Packed with nutritious ingredients, they satisfy cravings while keeping you energized. With endless variations and easy preparation, these cookies make it simple to enjoy guilt-free mornings. Try them out and revolutionize your breakfast routine!

Breakfast Cookies
Equipment
- Oven
- Baking Sheets
- Parchment paper
- Stand mixer or hand mixer
- ¼-cup measuring cup
- Cooling Rack
Ingredients
Dry Ingredients
- 2 cups quick oats or old-fashioned whole rolled oats
- ½ teaspoon salt
- 1 teaspoon ground cinnamon
Wet Ingredients
- 1 cup almond butter or peanut butter or sunflower seed butter
- ¼ cup pure maple syrup or honey
- ⅓ cup apple butter *
- ½ cup mashed banana (about 1 large banana)
Add-ins
- ½ cup dried cranberries
- ½ cup pepitas (pumpkin seeds)
- ½ cup raisins
- ¼ cup ground flaxseed optional
Instructions
Baking Instructions
- Preheat oven to 325°F (163°C). Line 2 large baking sheets with parchment paper or silicone baking mats. Set aside.
- Combine all of the ingredients into a large bowl of a stand mixer (or use a hand mixer). Mix until all of the ingredients are combined. The dough is thick and heavy.
- Using a ¼ cup measuring cup, portion ¼ cup mounds of cookie dough (about 70g each) onto prepared cookie sheet. Use the back of a spoon to slightly flatten out into a cookie shape. (The cookies will not spread in the oven.)
- Bake for 16–19 minutes or until the edges are lightly browned. Cool cookies on the baking sheets for 10 minutes, then transfer to a wire rack to cool completely.
- Cover leftover cookies and store at room temperature for up to 5 days or in the refrigerator for up to 10 days.


Leave a Reply