
Introduction to Cast Iron Apple Crisp
There's something magical about a warm cast iron apple crisp coming out of the oven. The delicious aroma of cinnamon and baked apples fills your home, inviting anyone nearby to take a look. But why should you choose cast iron for your apple crisp?
Why Cast Iron for Your Apple Crisp?
Using a cast iron skillet not only provides a rustic presentation but also ensures even cooking and superior heat retention. This means your apples soften beautifully while the topping becomes wonderfully crispy. For those new to cooking with cast iron, it’s worth noting that these skillets improve with age, developing a natural non-stick surface. Plus, you can transition seamlessly from stovetop to oven, making the cooking process easier and more efficient.
Another benefit is that cast iron retains heat longer, meaning your apple crisp will stay warm and delightful for that second serving—if it lasts that long! If you're curious about maintenance and care for your cast iron cookware, check out this guide on cast iron skillet care to make the most of your investment.
So gather your ingredients, preheat that oven, and get ready to impress with a homemade cast iron apple crisp. You won’t regret it!

Ingredients for Cast Iron Apple Crisp
When it comes to crafting the perfect cast iron apple crisp, gathering the right ingredients is essential for a delightful dessert. Here’s a breakdown of what you’ll need for both the filling and the topping.
Filling Ingredients
- 6 medium apples: Choose your favorites like Honey Crisp or Granny Smith for a balance of sweetness and tartness. Make sure to peel, core, and cut them into small pieces.
- 3 tablespoons unsalted butter: This adds richness and helps caramelize the apples as they bake.
- ⅓ cup brown sugar: For that deliciously sweet depth—both light and dark versions work well.
- 2 teaspoons ground cinnamon: This is where the magic happens; it adds warmth and a signature fall flavor.
- ⅛ teaspoon Diamond Crystal kosher salt: Just a pinch to enhance the sweetness and balance the flavors.
Topping Ingredients
- 1 ¼ cup old fashioned oats: This gives a hearty texture to the crisp topping.
- 2 tablespoons all-purpose flour: Helps bind the topping and make it extra crunchy.
- 5 tablespoons cold unsalted butter: Cut into pieces; you'll want those nuggets of butter for a perfect crumble.
- ⅓ cup brown sugar: For sweetness and that coveted caramelized top.
- ⅛ teaspoon Diamond Crystal kosher salt: Just a touch to round out the flavor.
- Sprinkle of ground cinnamon: A final touch to tie everything together beautifully.
Gathering these ingredients will set you up for a cast iron apple crisp that’s not only delicious but also perfectly textured. Explore more about ingredient choices and tips in our other sections!
Step-by-Step Preparation of Cast Iron Apple Crisp
The heart of cast iron apple crisp lies in its warm, cozy flavors that remind us of home. Let's dive into how to create this delightful dish step by step!
Prepare the Apples
First things first: the apples! Choose your favorites—Cortland, Honeycrisp, or Pink Lady work wonderfully. Peel, core, and cut about six medium apples into small pieces, setting them aside in a large mixing bowl. If you’re short on time, an apple peeler can save you a few precious minutes that you’ll need later for caramelizing those delicious slices.
Make the Filling
Grab a 10-inch cast iron skillet and preheat it over medium-low heat. Melt 3 tablespoons of unsalted butter in the skillet. Once melted, whisk in ⅓ cup of brown sugar, 2 teaspoons of ground cinnamon, and a pinch of kosher salt—let that flavor harmony begin! Pour this buttery goodness over your apple slices and toss until they’re beautifully coated. Then, return the apple mixture to the skillet, increasing the heat to medium. Cook, stirring occasionally, for about 5 minutes until the apples begin to soften. The heavenly scent filling your kitchen will have you eagerly anticipating the final dish!
Combine the Topping
In a separate medium mixing bowl, combine 1¼ cup of old-fashioned oats, 2 tablespoons of all-purpose flour, ⅓ cup of brown sugar, and ⅛ teaspoon of kosher salt. Toss in 5 tablespoons of cut-cold butter and mix everything together using your hands or a pastry cutter. Remember, having little lumps of butter is perfectly fine—it adds texture to your topping! Don’t forget a light sprinkle of ground cinnamon to elevate that incredible aroma.
Assemble the Apple Crisp
Now for the fun part—assembling your cast iron apple crisp! Evenly distribute the oatmeal topping over the softened apples in the skillet. Make sure to cover all the apples to lock in that flavor during baking. This is where your beautiful creation starts coming together.
Bake to Perfection
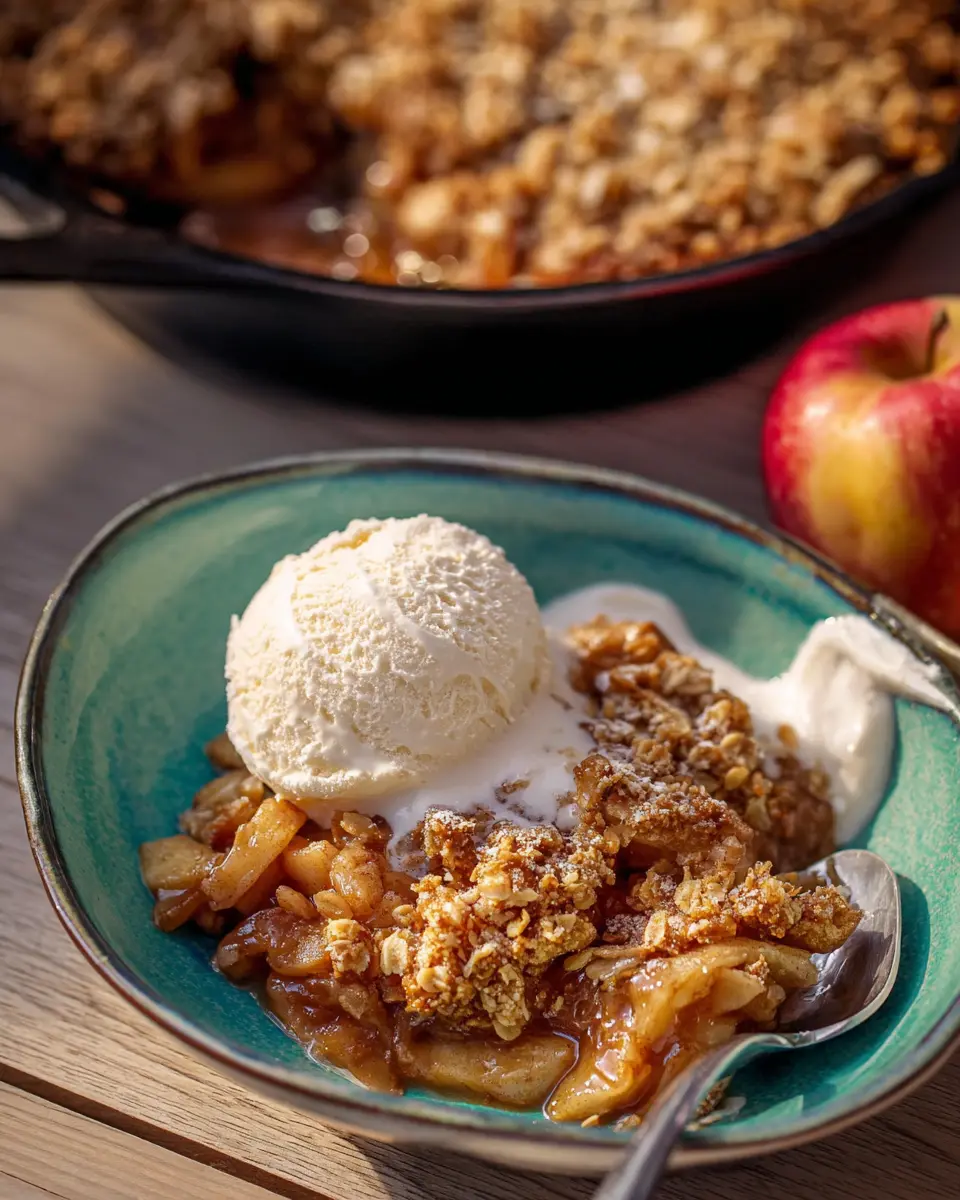
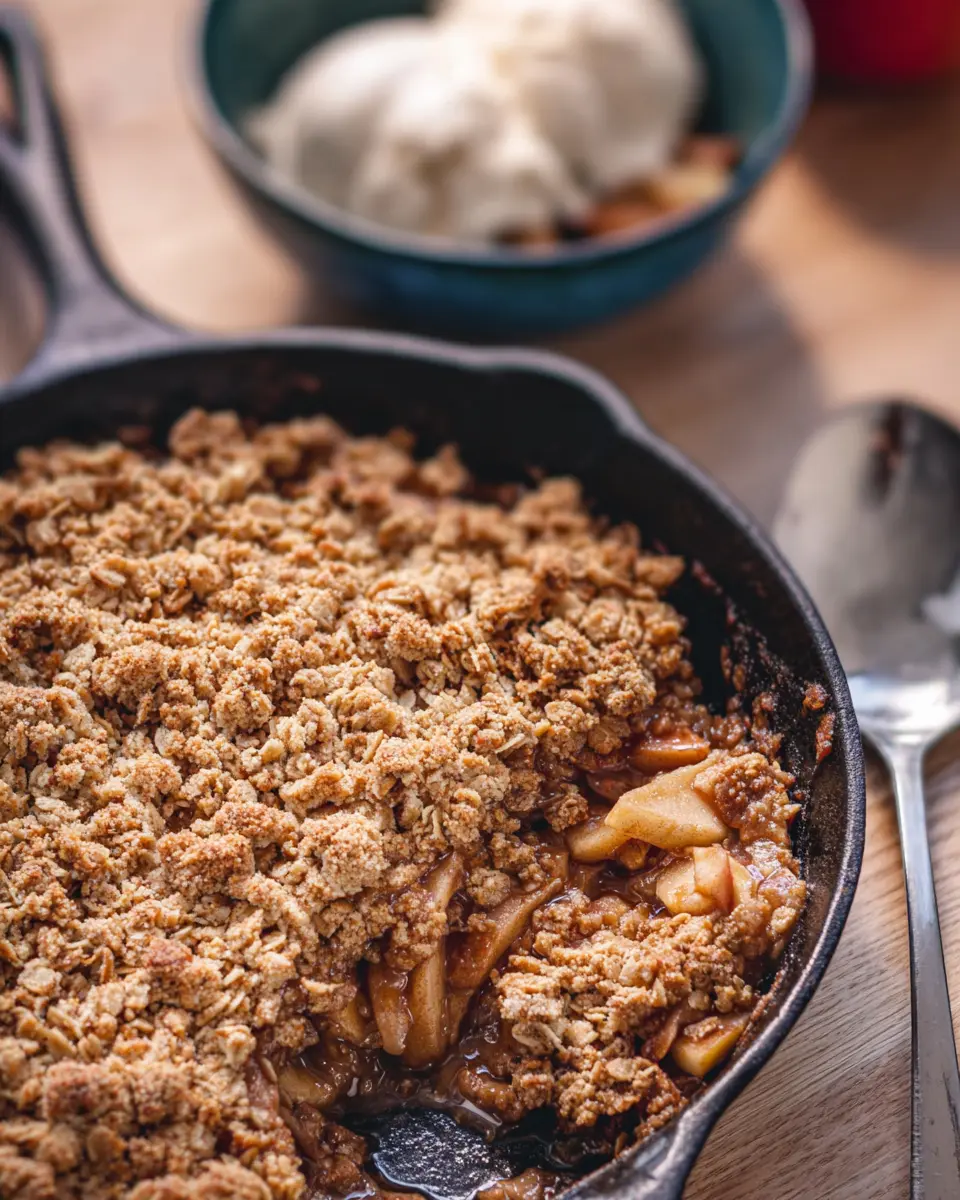
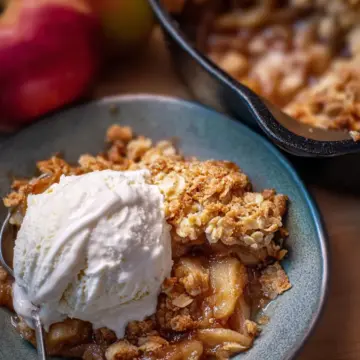
Preheat your oven to 350°F (if you haven't already), and then pop your skillet into the oven for about 35-40 minutes. You'll know it’s done when the apples are tender, slightly bubbling, and the topping forms a golden, crunchy layer. Allow the crisp to rest at room temperature for around 30 minutes before serving; this lets it set and enhances those deep flavors.
And there you have it! Mastering this cast iron apple crisp is all about the love and attention you put into each step. Don't hesitate to mix it up—consider pairing your caramelized apple delight with a scoop of vanilla ice cream for a truly indulgent experience. Enjoy this delightful dessert with friends or family, or savor it all by yourself; we don't judge!
Variations on Cast Iron Apple Crisp
Different apple varieties
When making a cast iron apple crisp, the type of apples you choose can make all the difference! For a delightful balance of sweetness and tartness, try using Honeycrisp, Granny Smith, or Pink Lady apples. If you prefer a more traditional flavor, Cortland and Empire apples are fantastic options. Remember, the beauty lies in mixing varieties; it adds depth and complexity to your dish. Curious about seasonal apple options? Check out The Apple Farm for more information on local apple varieties that may be available near you!
Alternative toppings
While the classic topping is hard to beat, experimenting can elevate your cast iron apple crisp to new heights! Consider adding chopped nuts like pecans or walnuts for extra crunch, or even sprinkling shredded coconut for a tropical twist. Want a little spice? Mix in some ginger or nutmeg with the oats. For a creamier texture, a little scoop of Greek yogurt on top can’t hurt either! The options are endless, so don't be shy to make it your own!
Cooking Tips and Notes for Cast Iron Apple Crisp
Tips for Working with Cast Iron
Using a cast iron skillet for your apple crisp not only enhances flavor but also promotes even cooking. Remember to preheat your skillet to avoid sticking. For easy cleanup, always season your skillet after use and avoid soaking it in water. If food does stick, use a gentle scrub pad and re-season.
Storage Suggestions
To keep your cast iron apple crisp fresh, store it in an airtight container in the refrigerator for up to five days. If you have leftovers, simply reheat them in the oven at 350°F until warmed, preserving that delightful crisp topping. For longer storage, consider freezing portions wrapped tightly to enjoy later!
Serving Suggestions for Cast Iron Apple Crisp
Perfect Pairings
To elevate your cast iron apple crisp, consider serving it warm with a side of vanilla ice cream or whipped cream. The creamy texture beautifully contrasts with the crunchy topping, enhancing every mouthful. For those who enjoy a little indulgence, a drizzle of caramel sauce or a sprinkle of chopped nuts can add delightful flavor and crunch. For a more refreshing touch, pair it with a scoop of frozen yogurt or a dollop of Greek yogurt to balanced sweetness.
Dessert vs. Breakfast: Where Does It Fit?
Why choose when you can have the best of both worlds? While traditionally a dessert, your cast iron apple crisp makes a fantastic breakfast option, too! Just think about it: warm, spiced apples topped with oats offer a hearty start to your day. Grab a cup of coffee or a refreshing herbal tea to round out the meal. Want more information on breakfast options? Check out this guide on healthy breakfast pairings. Enjoy your cast iron apple crisp at any time of day!
Time Breakdown for Cast Iron Apple Crisp
When you’re in the mood for a delightful cast iron apple crisp, it's helpful to know how your time will be spent. Here’s a quick breakdown to keep your cooking seamless.
Preparation time
Set aside about 20 minutes for peeling and chopping your apples and mixing together the ingredients for both the filling and topping.
Cooking time
Once your cast iron apple crisp is assembled, it will take approximately 35-40 minutes to bake to perfection in the oven.
Total time
In total, you’re looking at around 55-60 minutes from start to finish. This makes it a perfect dessert option for any evening dinner!
For more tips on cooking times and best practices, explore resources like Cooking Light and Serious Eats to inspire your kitchen adventures. Enjoy making this warm, comforting dish!
Nutritional Facts for Cast Iron Apple Crisp
When you indulge in a serving of cast iron apple crisp, you’re treating yourself to a delightful mix of flavors and nutrients. Here’s a quick glance at the nutritional profile:
Calories per serving
Each serving of this delicious crisp contains approximately 200 calories, making it a satisfying dessert without overwhelming your caloric intake.
Sugar content
Satisfying your sweet tooth, this cast iron apple crisp has about 12 grams of sugar per serving, primarily from the natural sugars in apples and added brown sugar.
Fiber content
With around 3 grams of fiber in every serving, this dish not only tastes great but also contributes to your daily fiber intake, promoting healthy digestion.
Enjoy this delightful recipe while being mindful of your nutritional goals. For more information on dietary fiber, check out the American Heart Association.
FAQs about Cast Iron Apple Crisp
How do I know when my apple crisp is done?
Knowing when your cast iron apple crisp is ready is crucial for that perfect balance of tender apples and crunchy topping. Look for a golden-brown topping and bubbling juice around the edges. The apples should be soft but not mushy. A good rule of thumb? Bake for 35-40 minutes at 350°F, and let it cool for about 30 minutes before digging in—this helps the flavors meld beautifully.
Can I make it ahead of time?
Absolutely! You can prepare the filling and topping the night before. Just store them separately in the fridge. When you're ready to bake, assemble in your preheated cast iron skillet, and you're good to go! This saves time and makes hosting a breeze.
What are some tips for using cast iron pans?
Using a cast iron pan can elevate your apple crisp. Here are some friendly tips:
- Preheat your skillet: This helps achieve that crispy topping.
- Keep it well-oiled: A well-seasoned pan will prevent sticking and improve flavor.
- Avoid drastic temperature changes: Let the pan cool before washing it to maintain its seasoning.
For more helpful tips on cast iron maintenance, visit this resource to keep your cookware in top shape!
Conclusion on Cast Iron Apple Crisp
There's nothing quite like sharing a warm, cast iron apple crisp with friends and family. The delightful combination of tender apples and crunchy topping is truly comforting. Remember to experiment with your favorite apples and topping variations for a personalized twist. Enjoy every bite!
For more delicious recipes and tips, check out Food Network and Serious Eats.
Cast Iron Apple Crisp
Equipment
- 10-inch cast iron skillet
- Mixing bowls
- pastry cutter
Ingredients
Filling
- 6 medium apples peeled, cored and cut into small pieces
- 3 tablespoons unsalted butter for the filling
- ⅓ cup brown sugar
- 2 teaspoons ground cinnamon
- ⅛ teaspoon Diamond Crystal kosher salt
Topping
- 1 ¼ cup old fashioned oats
- 2 tablespoons all purpose flour
- 5 tablespoons cold unsalted butter cut into 5 pieces
- ⅓ cup brown sugar
- ⅛ teaspoon Diamond Crystal kosher salt
- ground cinnamon for sprinkling
Instructions
Prepping the Apples
- Preheat the oven to 350F.
- Add cut up, peeled and cored apple slices to a large mixing bowl and set aside.
Make the Filling
- Preheat a 10 inch cast iron skillet over medium low heat and melt the butter for the filling.
- Once the butter is melted, whisk in brown sugar, cinnamon and salt.
- Pour the butter mixture over the apples in the mixing bowl and toss until the apples are well coated.
- Add the apples and butter mixture back into the skillet and turn the heat up to medium. Stir occasionally while it cooks for 5 minutes, until the apples begin to soften. Remove the pan from the heat, but keep the apple mixture in it.
- After the apples are partially cooked, cut the 5 tablespoons of butter into 5 separate pieces.
Make the Topping
- Add all the toppings EXCEPT the ground cinnamon into a medium mixing bowl. Combine ingredients using either your hands or a pastry cutter. It is okay to have small lumps of butter throughout the mixture.
- Top the apples in the skillet with the topping evenly and sprinkle on the cinnamon. Place in the oven.
Bake
- Cook for 35-40 minutes, until the apples are tender, slightly bubbling and the topping is crunchy.
- Allow to rest and cool at room temperature for about 30 minutes before serving.


Leave a Reply