
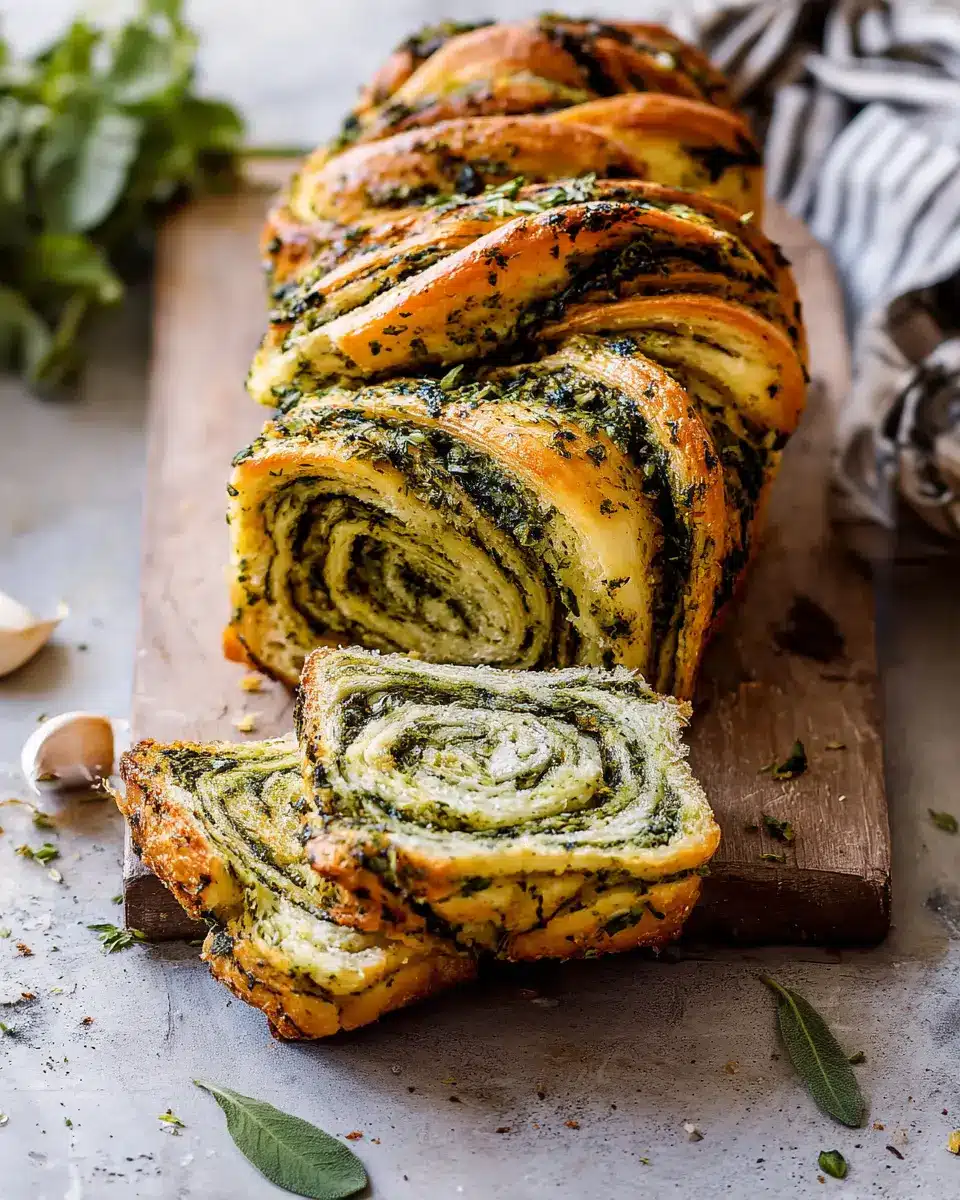
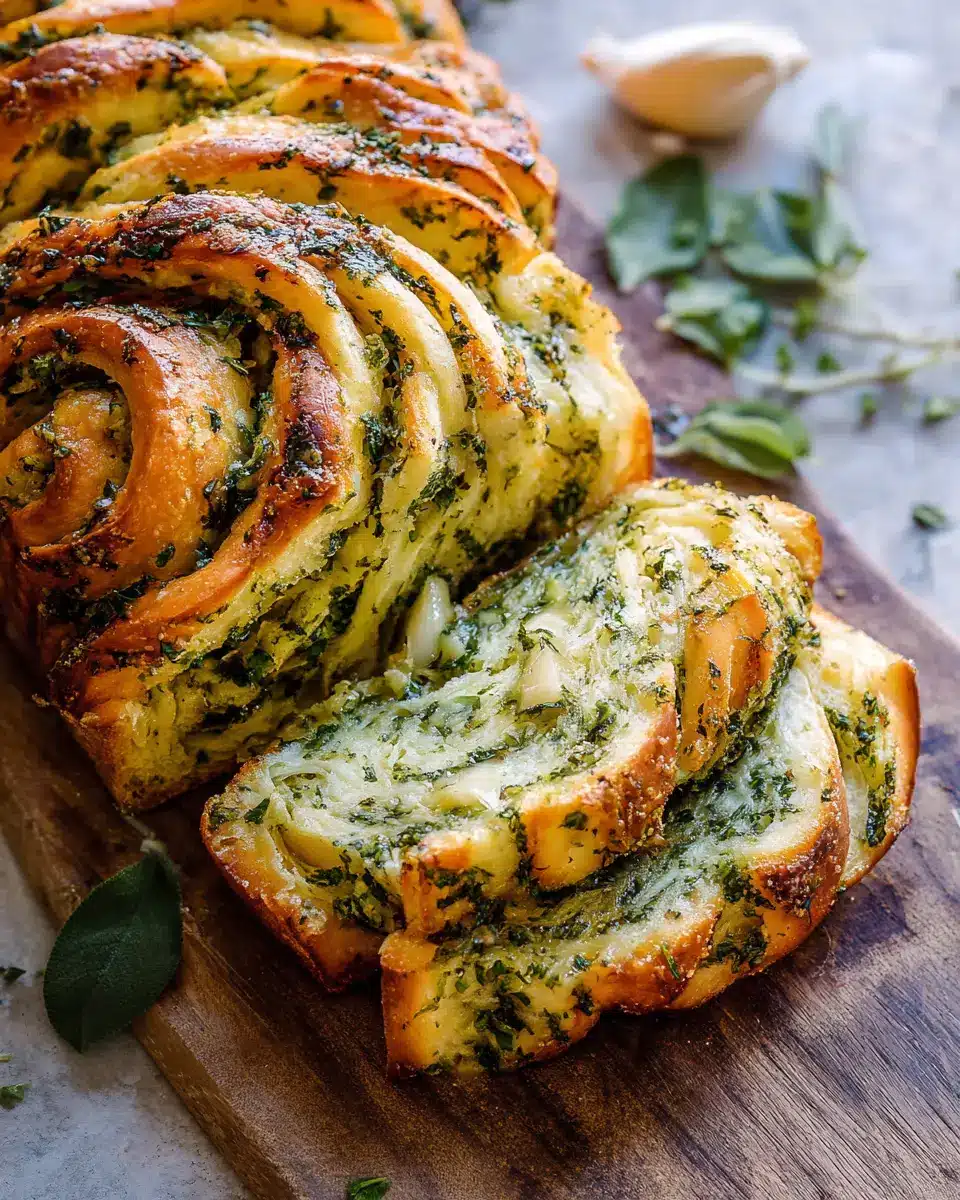
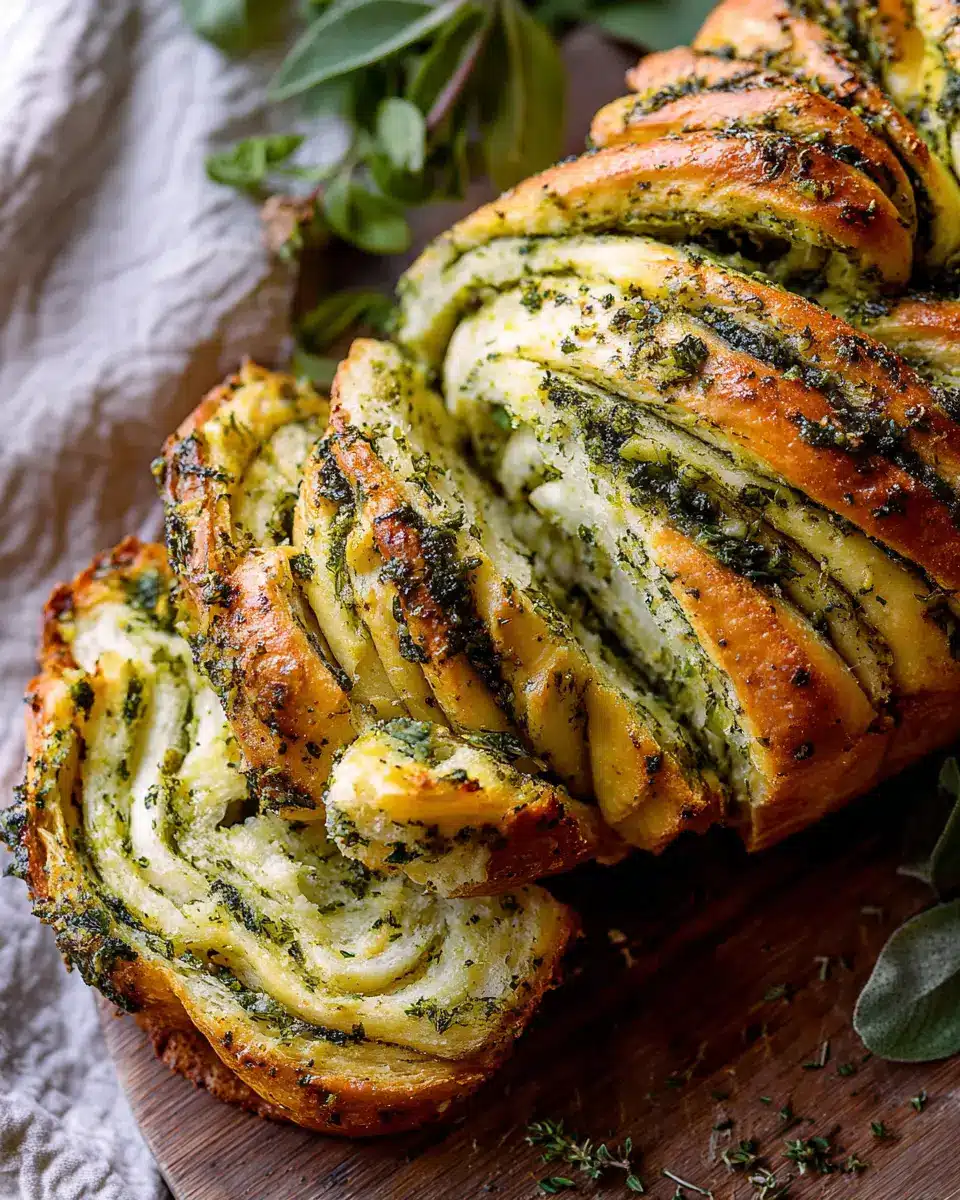
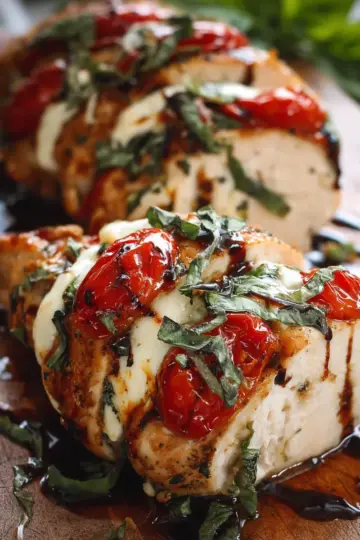
Introduction to Swirled Garlic Herb Bread
Why Homemade Bread is Worth It
Experiencing the mouthwatering aroma of freshly baked bread wafting through your kitchen is truly unbeatable. Homemade swirled garlic herb bread not only delights the senses but also fills your home with a sense of warmth and comfort. Imagine pulling a crispy loaf from the oven, its golden crust crackling as you slice into it—every bite revealing a perfect blend of garlic, herbs, and butter.
But why go through the effort of making bread at home? Well, for starters, you control the ingredients. You can choose high-quality, fresh items, ensuring that each slice is as wholesome and delicious as possible. Plus, making your own bread can be a fun and rewarding experience. It's a great way to unwind after a busy day and connect with your creative side. As you knead the dough, you’re not just creating a simple loaf; you're crafting something special to share with loved ones.
With the right recipe, like our swirled garlic herb bread, you'll soon impress family and friends with your baking skills. So wait no longer—let's dive into this delightful recipe that will elevate your bread-making game!
Ingredients for Swirled Garlic Herb Bread
Making the perfect swirled garlic herb bread starts with the right ingredients. This recipe combines classic baking staples with flavorful herbs and garlic to create a delightful loaf everyone will love.
Essential Ingredients You'll Need
- Warm Whole Milk: ¾ cup — This helps activate the instant yeast and gives the bread a tender crumb.
- Instant Yeast: 2 ¼ teaspoons — Essential for the perfect rise and fluffiness.
- Honey: 2 tablespoons — Adds a touch of sweetness and also boosts yeast activity.
- Large Eggs: 3 — They enrich the dough, making your bread moist and delicious.
- All-Purpose Flour: 3 ½ – 4 cups — The base of your bread; ensure it’s fresh for the best flavor.
- Kosher Salt: 1 teaspoon — Enhances all the flavors and strengthens the dough.
- Salted Butter: 6 tablespoons, plus more for serving — Adds richness and helps create that heavenly texture.
- Garlic: 1-2 cloves, grated or finely chopped — The star ingredient that gives this bread its distinctive flavor.
- Fresh Herbs: A mix of basil, thyme, and sage, finely chopped for a burst of freshness.
- Parmesan Cheese: ¼ cup, freshly grated — Enhances the umami flavor and pairs beautifully with garlic.
With these ingredients in hand, you’re just a few steps away from baking a loaf that will make your kitchen smell divine! For more ingredient ideas or to stock up, check out Target’s grocery section. Happy baking!
Step-by-step Preparation of Swirled Garlic Herb Bread
Making swirled garlic herb bread at home is a delightfully aromatic experience, and it’s easier than you might think! Let’s dive into the step-by-step process to create a bread that’s not just scrumptious but also visually captivating.
Prepare the Dough
Start by gathering your ingredients. In the bowl of a stand mixer, combine ¾ cup of warm whole milk, 2 ¼ teaspoons instant yeast, 2 tablespoons of honey, and 3 large eggs. Stir in 3 ½ to 4 cups of all-purpose flour and 1 teaspoon of kosher salt. Using the dough hook, mix until smooth—about 4–5 minutes. Remember, if the dough is sticky, don’t hesitate to add more flour gradually until you achieve a soft and cohesive texture.
Let It Rise
Once your dough is beautifully mixed, it’s time for the magic to happen. Cover the bowl with plastic wrap and let it sit at room temperature for about 1 hour or until it has doubled in size. This rising period is crucial, as it will give your bread its light and airy structure.
Make the Garlic Herb Butter
While the dough rises, let’s whip up a flavorful garlic herb butter. In a small bowl, combine 4 tablespoons of softened salted butter, grated or finely chopped garlic (1-2 cloves), ¼ cup freshly grated parmesan cheese, and ½ cup chopped fresh herbs (like basil, thyme, and sage). This mixture will be the star of the show, bringing that delicious garlicky aroma to life!
Roll Out the Dough
After the dough has risen, punch it down gently to release the air, then transfer it to a lightly floured surface. Roll out the dough into a large rectangle, about 12 x 18 inches. Spread your garlic herb butter evenly over the surface, making sure to cover every inch.
Shape and Twist the Dough
Now comes the fun part! Starting from the edge closest to you, roll the dough tightly into a log. Pinch the seam to seal it well. Using a sharp knife, cut the log in half lengthwise, leaving a small bit intact at one end. Turn the halves so the filling is exposed and give it a gentle twist to create a beautiful spiral effect.
Final Rise
Take your beautifully twisted dough and coil half of it like a snake, then repeat with the other half in the opposite direction. This not only looks intricate but also enhances the flavor distribution. Carefully place it on a parchment-lined baking sheet, cover it, and allow it to rise for another 45 minutes.
Bake the Bread
Preheat your oven to 350°F. Once fully risen, pop your bread into the oven and bake for 30-35 minutes until it’s golden brown and sounds hollow when tapped. For a finishing touch, brush the top with a little melted butter. Serve warm, and enjoy every savory bite of your homemade swirled garlic herb bread!
With this guide, you're well on your way to impressing family and friends with a delicious homemade bread that’s perfect for any occasion. Happy baking!
Variations on Swirled Garlic Herb Bread
Different Herb Combinations
The beauty of swirled garlic herb bread lies in its versatility! Why not experiment with different herbs to create a unique flavor profile? If you’re a fan of a Mediterranean twist, consider using fresh rosemary, oregano, and parsley. For a more robust flavor, try dill and chives. Each combination brings a new character to the bread, making it a delightful surprise each time you bake.
Cheesy Swirls
Who doesn’t love a little extra cheese? To elevate your swirled garlic herb bread, think about adding a generous layer of shredded mozzarella or cheddar cheese before rolling it up. This cheesy addition melts beautifully as it bakes, creating a gooey, savory surprise in each slice. Consider pairing the cheese with your favorite herbs for an irresistible combination that will keep friends and family coming back for seconds.
Explore gourmet cheeses like Gruyère or Fontina for a luxurious touch! There’s no end to the delicious adventures waiting for you in your kitchen.
Cooking Tips and Notes for Swirled Garlic Herb Bread
Common Mistakes to Avoid
When making swirled garlic herb bread, there are a few key pitfalls to watch out for:
- Don’t rush the dough: Patience is vital. Allow the dough to rise until it has doubled in size; this ensures a light, airy texture.
- Mind the flour: While incorporating flour, be careful not to add too much at once. Start with a smaller amount and adjust gradually to maintain a soft, elastic dough.
- Sealing the rolls: When rolling the dough, make sure it's compact and seals well to keep that delicious garlic herb filling intact.
- Watch baking time: Every oven is different. Start checking your loaf a few minutes early to prevent overdrying.
With these simple tips, your swirled garlic herb bread will surely impress at your next gathering! For more insights on yeast bread techniques, consider checking out King Arthur Baking, which offers fantastic resources for home bakers.
Serving Suggestions for Swirled Garlic Herb Bread
Perfect Pairings for Your Bread
Swirled garlic herb bread deserves a spot at every meal, thanks to its savory flavor and delightful aroma. Here are some fantastic serving suggestions to elevate your experience:
-
Dipping Delight: Serve warm slices with a mix of olive oil and balsamic vinegar for a delicious dip. This rich combination complements the garlic and herbs beautifully.
-
Hearty Soups: Pair your bread with creamy soups like tomato basil or hearty minestrone. The bread’s texture adds a satisfying crunch alongside velvety soups.
-
Sandwich Base: Use it as a sandwich foundation for turkey bacon or chicken ham. Imagine layers of fresh veggies and your favorite spreads enveloped in that aromatic swirled goodness.
-
Brunch Star: Slice it up and offer as part of a brunch spread with fresh fruit, cheeses, and spreads—perfect for weekend gatherings!
Experiment with these ideas to find your favorite ways to enjoy this versatile bread!
Time Breakdown for Swirled Garlic Herb Bread
Understanding the timing for making swirled garlic herb bread can make your baking experience seamless and enjoyable. Here’s a quick guide to help you plan your cooking schedule.
Preparation Time
Plan for about 20 minutes to gather your ingredients, mix the dough, and prepare it for rising. It’s a straightforward process that’s well worth the effort!
Rising Time
Let your dough rise for 1 hour at room temperature, allowing it to double in size. This step is crucial for achieving that delightful, fluffy texture.
Baking Time
Bake your bread for 30-35 minutes at 350°F until it’s beautifully golden brown. The aroma that fills your kitchen will be irresistible!
Total Time
In total, you're looking at around 2 hours including preparation, rising, and baking time. This means you can enjoy fresh, homemade swirled garlic herb bread in no time. Happy baking!
For more tips on bread-making, check out King Arthur Baking or explore the offerings at Food Network.
Nutritional Facts for Swirled Garlic Herb Bread
Understanding the nutritional value of your homemade swirled garlic herb bread can help you enjoy it guilt-free! Here’s a quick breakdown of what you’re getting per slice:
Calories
Each slice of this delightful bread contains approximately 180 calories, making it a satisfying yet light addition to your meal. Perfect for pairing with soups or salads!
Carbohydrates
With about 30 grams of carbohydrates per slice, this bread provides the perfect fuel for your day. The carbs come primarily from the flour, offering energy that keeps you going, whether you’re at work or out and about.
Protein
A slice of swirled garlic herb bread boasts roughly 5 grams of protein. While it’s not a protein powerhouse, it contributes to your daily intake, especially when combined with other protein-rich foods like turkey bacon or chicken ham.
Enjoy your baking adventure and feel good about how your swirled garlic herb bread fits into a balanced diet! For more details, check out nutrition resources from the USDA or NutritionData. Happy baking!
FAQs about Swirled Garlic Herb Bread
How do I know my bread is done baking?
Determining if your swirled garlic herb bread is fully baked is simple! Look for a golden-brown crust and tap the bottom of the loaf — it should sound hollow. If you have a kitchen thermometer, the internal temperature should reach around 190°F for a perfectly cooked loaf.
Can I freeze this bread?
Absolutely! To freeze your swirled garlic herb bread, let it cool completely after baking. Wrap it tightly in plastic wrap and place it in a freezer-safe container. It can last up to three months. When you're ready to enjoy it, simply thaw at room temperature and warm it in the oven for a deliciously fresh taste.
What’s the best way to store leftovers?
For those delightful leftover slices, store your swirled garlic herb bread at room temperature in an airtight container or wrapped in foil to maintain freshness. If you prefer, you can toast individual pieces for a comforting, warm snack. For longer preservation, consider refrigerating — though it may dry out a bit faster. Enjoy your homemade creation at any time!
Conclusion on Swirled Garlic Herb Bread
In conclusion, this swirled garlic herb bread recipe combines simplicity and flavor, making it a perfect addition to any meal. Whether enjoyed warm with butter or toasted as a sandwich base, it's sure to impress. Happy baking, and enjoy your delicious creation! For more bread inspiration, explore King Arthur Flour for tips and techniques.

Swirled Garlic Herb Bread
Equipment
- Stand Mixer
- Baking sheet
- Plastic Wrap
Ingredients
Dough
- ¾ cup warm whole milk
- 2 ¼ teaspoons instant yeast
- 2 tablespoons honey
- 3 large eggs
- 3 ½ – 4 cups all-purpose flour plus more for rolling
- 1 teaspoon kosher salt
- 6 tablespoons salted butter at room temperature, plus more for serving
Filling
- 1-2 cloves garlic grated or finely chopped
- ¼ cup freshly grated parmesan cheese
- ½ cup fresh basil finely chopped
- 2 tablespoons chopped fresh thyme
- 1 tablespoon chopped fresh sage
Instructions
Preparation
- In the bowl of a stand mixer, combine the milk, yeast, honey, eggs, 3 ½ cups flour, and salt. Using the dough hook, mix until the flour is completely incorporated, about 4-5 minutes. Add 2 tablespoons room temp butter and mix until combined, about 2-3 minutes more. If the dough is still sticky, add the additional ½ cup flour, adding more as needed until the dough is smooth to touch.
- Cover the bowl with plastic wrap and let sit at room temperature for 1 hour or until doubled in size.
- Meanwhile, combine the remaining 4 tablespoons butter, the garlic, parmesan, basil, sage, and thyme in a small bowl.
- Punch the dough down and roll out onto a lightly floured surface, creating a large rectangle about 12 x 18 inches. Spread the garlic herb butter evenly over the dough. Starting with the long edge closest to you, roll the dough into a log, keeping it fairly tight as you go. When you reach the edge, pinch along the edge to seal.
- Using a sharp knife, cut the log of dough in half lengthwise, leaving a small portion at one end intact. Turn the halves to expose the filling. Cross the dough ropes over each other, repeating the twisting until you have a long, twisted dough.
- Coil half the rope up like a snake, stopping when you reach halfway. Then, coil the second half of the rope in the opposite direction. Carefully transfer to a parchment-lined baking sheet. Cover and let rise in a warm place for 45 minutes.
- Preheat the oven to 350 degrees F. Transfer the bread to the oven and bake 30-35 minutes, until the top is golden brown and the bread is cooked through. Brush the top of the loaf with butter. Slice and serve warm…with additional butter.


Leave a Reply