
Introduction to Garlic Bread Rolls
Why Garlic Bread Rolls are a Must-Try
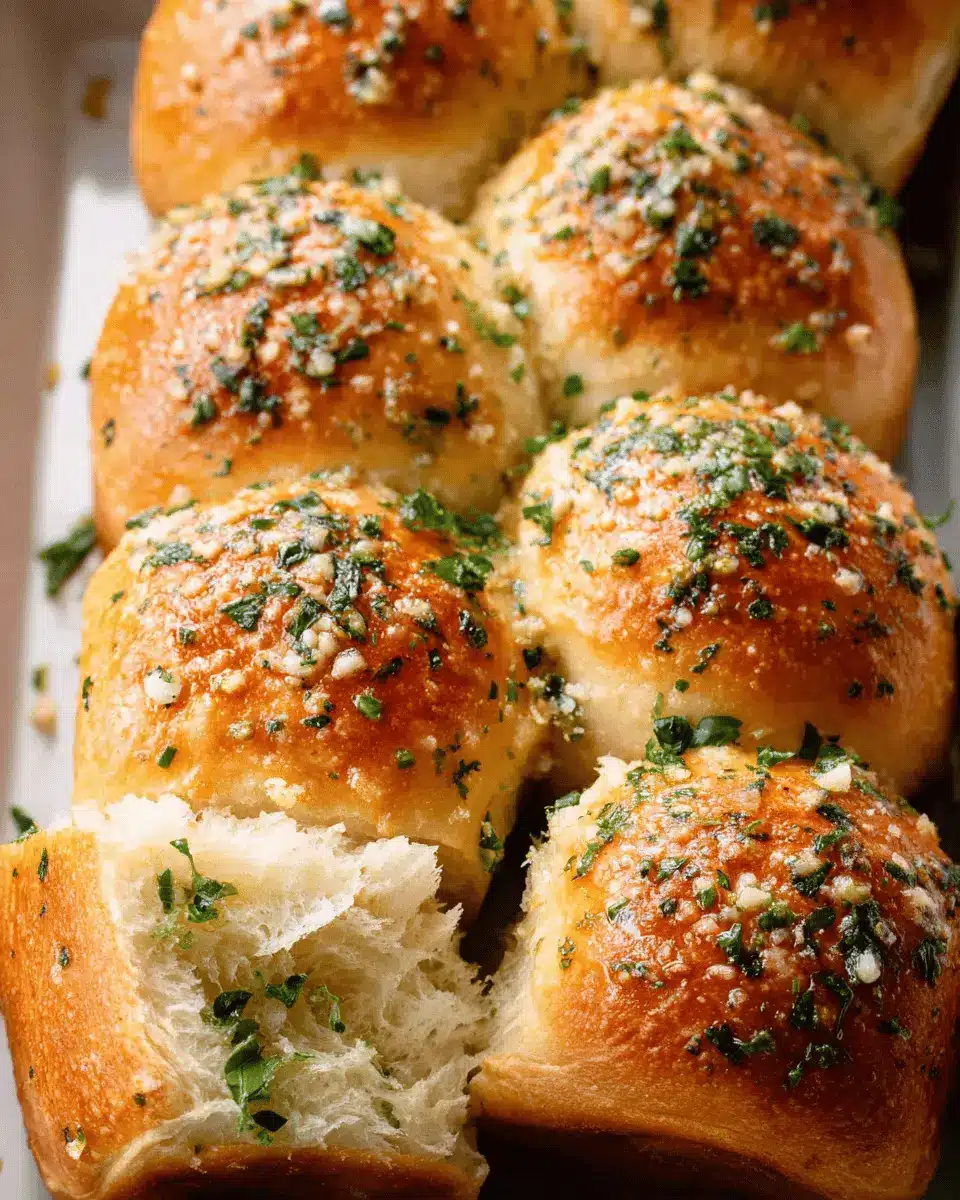
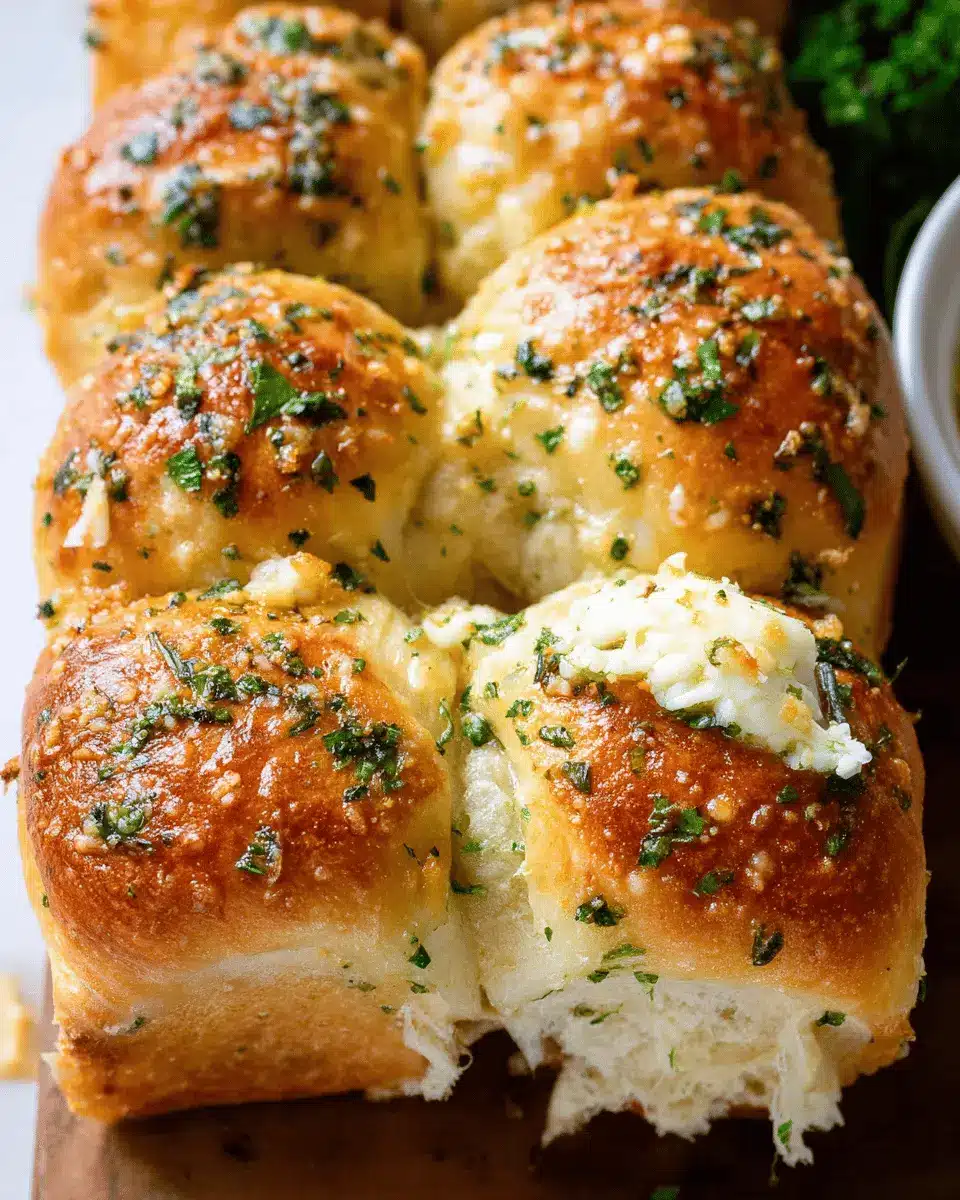
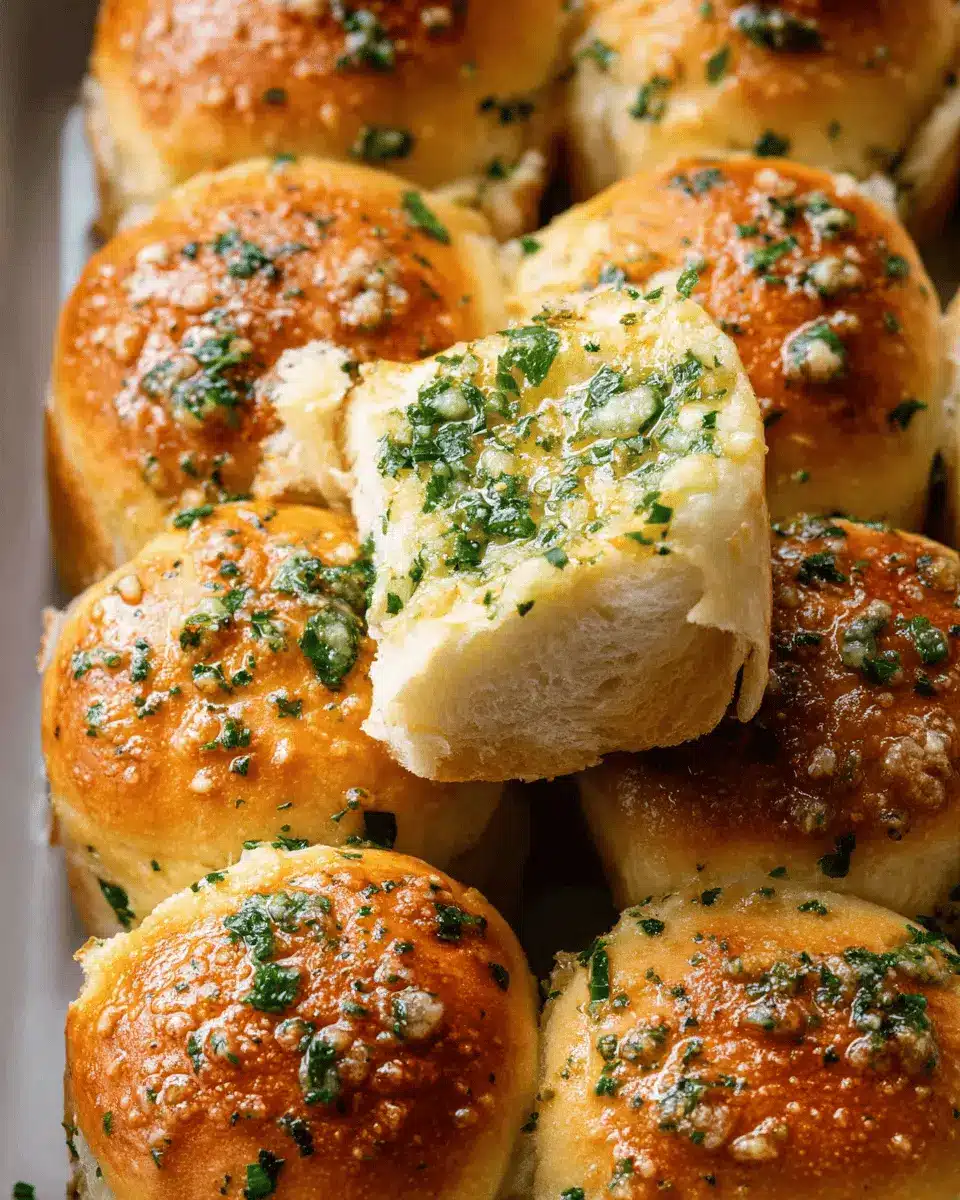
If you're on the lookout for a comforting and delightful addition to your dining experience, garlic bread rolls should definitely be on your radar. These warm, fluffy rolls come infused with the irresistible flavor of garlic and herbs, making them a perfect companion for pasta dishes, soups, or even as a stand-alone snack.
What sets these rolls apart is not just their delightful taste but also their appealing aroma that fills your kitchen while they bake. Imagine returning home to the welcoming scent of garlic and freshly baked bread—it's enough to make anyone feel at ease.
Plus, they’re surprisingly easy to make! With just a few simple ingredients, including all-purpose flour and fresh parsley, you can create rolls that are better than anything from the bakery. For an extra touch, slather the tops with homemade garlic butter as they come out of the oven. Oh, and don’t forget to sprinkle a little flaky sea salt!
Ultimately, garlic bread rolls are more than just a side dish; they're a delightful experience that adds warmth and flavor to any meal. So, roll up your sleeves, and let’s dive into creating these delicious bites! Discover the full recipe below to bring this scrumptious treat into your home kitchen.
Ingredients for Garlic Bread Rolls
For the perfect garlic bread rolls, you'll need a balance of rich flavors and simple ingredients. Here’s what you’ll gather for this delightful recipe:
- Butter: 4 ½ tablespoons unsalted butter, plus 2 tablespoons for the garlic butter. This is crucial for that soft texture and mouthwatering taste.
- Garlic: 2 tablespoons minced garlic will impart that irresistible aroma and flavor.
- Flour: 3 ½ cups plus 1 tablespoon of all-purpose flour creates the base of your rolls. Remember to measure it correctly for the best results!
- Herbs: 3 tablespoons chopped fresh parsley adds a pop of color and freshness.
- Yeast and Sugar: 2 ¼ teaspoons instant yeast and 1 tablespoon granulated sugar help in making the rolls light and fluffy.
- Milk and Egg: Use 1 cup of warmed whole or 2% milk (about 110°F) and 1 large egg for richness.
- Egg Wash: 1 beaten egg for brushing on top, giving your rolls a golden finish.
These simple ingredients come together to create garlic bread rolls that will wow your guests or be a comforting addition to your weeknight dinners! Keep reading for the full recipe!
Step-by-Step Preparation of Garlic Bread Rolls
Making homemade garlic bread rolls doesn't have to be a daunting task. With a little effort and love, you’ll have golden, fluffy rolls that are perfect for any meal. Let’s dive into the steps for preparing these delectable rolls!
Gather all ingredients
Before you start, ensure you have everything you need. Here’s a quick checklist:
- 4 ½ tablespoons unsalted butter
- 2 tablespoons minced garlic
- 3 ½ cups + 1 tablespoon all-purpose flour
- 3 tablespoons chopped fresh parsley
- 1 tablespoon granulated sugar
- 2 ¼ teaspoons instant yeast
- 1 teaspoon fine sea salt
- 1 cup whole or 2% milk, warmed to 110°F
- 1 large egg (room temperature)
- 1 beaten egg (for brushing the tops)
For the garlic butter, you’ll also need:
- 2 tablespoons unsalted butter
- 1 tablespoon minced garlic
- 1 tablespoon chopped fresh parsley
- Flaky sea salt for finishing
Make sure to measure your ingredients carefully; using a kitchen scale is recommended for best results. You can find some great measuring tips here.
Make the dough
Start by melting the 4 ½ tablespoons of unsalted butter in a small pot. Add the minced garlic and cook until fragrant, about 1-2 minutes. Meanwhile, combine the flour, parsley, sugar, yeast, and salt in a mixing bowl. Add the warmed milk, egg, and your garlic butter mixture, kneading everything together with a dough hook on low speed until the dough is smooth and slightly tacky—this usually takes about 10-12 minutes. If your dough is overly sticky, don’t hesitate to add a tablespoon of flour at a time until you reach a workable consistency.
Shape the rolls
Once you have your dough ready, divide it into 12 equal portions—aim for around 67 grams each for consistency. Shape each piece into a smooth ball by tucking the ends underneath. Pinch together the seam at the bottom to keep them tight. Place the rolls seam-side down in a lightly greased 9x13 pan, ensuring they’re snug. Cover with plastic wrap or a clean kitchen towel and let them rise in a warm area until they’ve doubled in size, typically between 1-2 hours.
Let the dough rise
This is where the magic happens! As your rolls rise, they’ll become airy and fluffy, setting the stage for your final baked product. It’s a perfect time to prepare any sides or gather condiments for your meal.
Bake the rolls
Preheat your oven to 350°F (180°C). Once the dough rolls have risen adequately, brush their tops with the beaten egg wash for a glorious golden finish. Bake them for about 20-30 minutes, or until their tops are beautifully golden brown. While they’re baking, melt the additional butter for your garlic topping, mixing in minced garlic and parsley.
When the rolls are out of the oven, brush them with the prepared garlic butter and sprinkle with flaky sea salt before serving. Enjoy your warm, homemade garlic bread rolls as a delightful addition to any meal!
Variations on Garlic Bread Rolls
Herb-Infused Garlic Rolls
For a delightful twist on traditional garlic bread rolls, consider adding a blend of fresh herbs like basil, rosemary, and thyme to your dough. This aromatic combination enhances the flavor profile and gives your rolls a more sophisticated flair. Just chop the herbs finely and incorporate them during the mixing stage, alongside the parsley. It’s a simple way to elevate your rolls and impress your guests!
Cheese-Stuffed Garlic Rolls
Who doesn’t love melty cheese? Try making cheese-stuffed garlic rolls by placing a cube of mozzarella or cheddar in the center of each dough ball before baking. As they bake, the cheese will melt beautifully, infusing the rolls with rich, creamy goodness. Serve them warm, and watch your friends and family indulge in the ooey-gooey delight! For more variations, explore different cheese options, such as feta or cream cheese, to match your palate.
Cooking Tips and Notes for Garlic Bread Rolls
Making garlic bread rolls is a delightful experience, and with a few handy tips, you can elevate your baking game!
-
Measuring Flour: Accurate measurements are crucial! Instead of scooping, use the spoon-and-level method to fluff up your flour before adding it to the measuring cup. For precision, a kitchen scale is your best friend.
-
Yeast Matters: If you choose active dry yeast, remember to activate it first. Let it sit in warm milk with a splash of sugar until foamy—this ensures your rolls rise beautifully.
-
Make-Ahead Magic: If you're tight on time, shape your rolls the night before and refrigerate them. Just allow extra rising time in the morning before baking!
-
Storage Tips: Keep rolls in an airtight container at room temperature for up to 3 days. For longer storage, freeze them, and enjoy them anytime!
For more tips on baking skills, check out resources like King Arthur Baking for expert advice!
Serving Suggestions for Garlic Bread Rolls
Garlic bread rolls are incredibly versatile, perfect for various meals and occasions. Here are some delightful ways to serve them:
- As an Appetizer: Serve warm, brushed with extra garlic butter for a mouthwatering starter that’s sure to impress.
- With Soup or Salad: Pair these rolls with classic favorites, like a hearty minestrone or a crisp Caesar salad. They make an excellent companion for soaking up delicious broth.
- At a Barbecue: These rolls complement your summer cookouts beautifully. Serve alongside grilled chicken, beef burgers, or even turkey bacon skewers.
- For Breakfast: Don’t underestimate their potential! Try them with scrambled eggs or a side of cream cheese spread for a satisfying morning bite.
No matter how you enjoy your garlic bread rolls, they’re bound to be a hit at your table! For more ideas, check out Cooking Light for tasty side dishes that pair wonderfully.
Time Breakdown for Garlic Bread Rolls
Preparation Time
The preparation time for these delicious garlic bread rolls is approximately 20 minutes. This includes measuring your ingredients, mixing the dough, and shaping it into rolls. It’s the perfect opportunity to turn on your favorite playlist and enjoy the process!
Rising Time
After shaping, allow the rolls to rise for 1 to 2 hours, depending on your kitchen temperature. The dough should double in size, creating soft, fluffy rolls that are hard to resist.
Baking Time
Baking your garlic bread rolls will take about 20 to 30 minutes at 350°F (180°C). You’ll know they’re ready when they develop that beautiful golden-brown hue on top.
Total Time
In total, you're looking at around 2 to 3 hours from start to finish. This includes preparation, rising, and baking time. Trust me, the wait is worth every minute when you savor that first buttery, garlic-infused bite!
If you want to enhance your cooking skillset further, check out this guide on bread baking. Furthermore, feel free to experiment with variations - perhaps adding cheese or herbs into your garlic bread rolls for an exciting twist!
Nutritional Facts for Garlic Bread Rolls
When indulging in garlic bread rolls, it's helpful to understand their nutritional value. Here's a quick overview to guide your choices:
Calories
Each roll typically contains around 150 calories, making them a delightful, yet somewhat indulgent treat.
Protein
You can expect about 4 grams of protein per roll. This helps to balance your meal, especially if served alongside a fresh salad or soup.
Sodium
With approximately 200 mg of sodium per roll, it's wise to enjoy them in moderation, particularly if you're watching your sodium intake.
These rolls are perfect for sharing at dinner parties or enjoying as a side dish. To dive deeper into health benefits, consider checking out resources from the Mayo Clinic or the Harvard T.H. Chan School of Public Health.
FAQs about Garlic Bread Rolls
Can I use whole wheat flour for garlic bread rolls?
Absolutely! You can substitute whole wheat flour for all-purpose flour in your garlic bread rolls. Just keep in mind that whole wheat flour may result in a denser texture. To maintain lightness, you might consider blending whole wheat with all-purpose flour in a 50/50 ratio. This will give you a nutty flavor while keeping the rolls fluffy.
How do I store leftover garlic bread rolls?
Leftover garlic bread rolls are best stored in an airtight container or a ziplock bag at room temperature. They typically stay fresh for 2-3 days. If they're not gone by then, consider reheating them in the oven for a few minutes to regain that delightful warmth and texture.
Can I freeze garlic bread rolls?
Yes! Freezing is a great option if you want to enjoy garlic bread rolls at a later time. After baking, let the rolls cool completely, then transfer them to an airtight container and store them in the freezer for up to a month. When you’re ready to eat, simply thaw and reheat them in the oven to restore that fluffy goodness!
For more tips on baking and storing bread, check out resources from the Bread Bakers Guild.
Conclusion on Garlic Bread Rolls
In summary, garlic bread rolls are a delightful addition to any meal, bringing warm, buttery goodness to the table. Making them at home not only enhances your cooking skills but also fills your kitchen with irresistible aromas. Enjoy them fresh, warm, and paired with your favorite dishes!

Garlic Bread Rolls
Equipment
- 9x13 baking pan
- Stand Mixer
- Dough Hook
- Small pot
Ingredients
Dough Ingredients
- 4.5 tablespoons unsalted butter
- 2 tablespoons minced garlic
- 3.5 cups all-purpose flour plus 1 tablespoon
- 3 tablespoons chopped fresh parsley
- 1 tablespoon granulated sugar
- 2.25 teaspoons instant yeast
- 1 teaspoon fine sea salt
- 1 cup whole or 2% milk warmed to 110°F
- 1 large egg room temperature
- 1 beaten egg for brushing the tops
Garlic Butter
- 2 tablespoons unsalted butter
- 1 tablespoon minced garlic
- 1 tablespoon chopped fresh parsley
- flaky sea salt for finishing
Instructions
Prep and Dough Making
- Lightly butter the bottom and sides of a 9×13 pan and set it aside.
- In a small pot, melt the butter and add the minced garlic. Cook for 1-2 minutes or until the garlic is fragrant. Take off the heat and cool while you measure the other ingredients.
- In a stand mixing bowl, combine the flour, parsley, sugar, yeast, and salt. Then add the warmed milk, egg, and garlic butter from above. Knead on low speed with the dough hook until the dough looks smooth and feels soft and tacky, about 10-12 minutes.
- Cut the kneaded dough into 12 equal portions. Shape each piece of dough into a smooth ball. Pinch the bottom of the roll where the seam comes together to keep it tight. Place the shaped dough balls into the prepared baking pan. Cover the top with plastic wrap or a clean kitchen towel and set them in a warm place to rise until doubled in size, about 1-2 hours.
Baking
- Preheat the oven to 350°F (180°C).
- Brush the tops of the rolls with the beaten egg wash. Then bake the dinner rolls for 20-30 minutes, or until the tops are golden brown.
- While the rolls are baking, make the garlic butter. Melt the butter in a pot and add the minced garlic. Cook for 1-2 minutes until the garlic is fragrant. Remove it from the heat and stir in the parsley. When the rolls come out of the oven, immediately brush them with the garlic butter. Sprinkle with flaky sea salt if desired, and serve warm!


Leave a Reply