
Introduction to Halloween Mini Pizzas
When it comes to Halloween festivities, creativity is key! Halloween Mini Pizzas are the perfect marriage of deliciousness and fun, allowing you to channel your inner artist while satisfying those snack cravings. These bite-sized delights aren’t just tasty; they offer a fantastic opportunity to get friends and family involved in the kitchen. Picture this: you, surrounded by friends, creating little edible masterpieces that double as art and dinner.
What makes these mini pizzas a fun treat is their versatility and ease of preparation. From creepy ghosts to whimsical jack-o’-lanterns, you can customize each pizza to reflect your personality or party theme. Experts recommend involving kids in meal prep to foster creativity, and what better way to do that than with a little Halloween-themed cooking? Moreover, mini pizzas can cater to diverse tastes—think turkey bacon or chicken ham as toppings to accommodate different dietary preferences.
If you're looking to spice up your Halloween gatherings, consider making Halloween Mini Pizzas a part of your festivities this year. Enjoy the process, and don’t be afraid to get a little messy—you might just end up with a spooky masterpiece! For more ideas on Halloween treats, check out resources from Taste of Home or Food Network.
Ingredients for Halloween Mini Pizzas
Spook up your Halloween festivities with these delightful Halloween Mini Pizzas. Making these tasty treats is not only easy but a fun way to celebrate the season with friends and family. To get started, gather your ingredients and let’s create some hauntingly fantastic mini pizzas!
Essential Ingredients
- 8 mini pizza crusts: You can use store-bought or make your own for a personal touch. Consider checking out this easy homemade pizza dough recipe.
- 1 cup pizza sauce: A flavorful sauce is key! Use your favorite brand or whip up a quick homemade version.
- 2 cups shredded mozzarella cheese: This will serve as the gooey pizza base that everyone loves.
- 8 slices mozzarella cheese: Cut these into ghost shapes for a spooky twist.
- 12 slices pepperoni: Cut spooky shapes or leave them as they are for a classic touch.
- 1 small black olive: Sliced for the eyes of your ghosts or mummies.
- 1 orange bell pepper: Cut into fun pumpkin shapes for festive decoration.
With these ingredients in hand, you're ready to create some unforgettable Halloween snacks! Looking for more topping ideas? Check out Serious Eats for inspiration on how to customize your own mini pizzas.
Step-by-Step Preparation of Halloween Mini Pizzas
Gather your ingredients and equipment
Before embarking on your spooky culinary adventure, let’s make sure you have everything you need for your delightful Halloween Mini Pizzas. Head to your kitchen and grab the following ingredients:
- Mini Pizza Crusts: 8 store-bought or homemade.
- Pizza Sauce: 1 cup to spread over your crusts.
- Shredded Mozzarella Cheese: 2 cups to bring that ooey-gooey goodness.
- Mozzarella Cheese Slices: 8 for crafting ghost shapes.
- Pepperoni: 12 slices for a classic topping.
- Black Olive: 1 small, sliced for ghostly eyes.
- Orange Bell Pepper: Cut into pumpkin shapes for decoration.
Don’t forget your equipment! You’ll need a baking sheet, parchment paper, a small knife, a cutting board, and an oven.
Preheat and prepare your baking sheet
Start by preheating your oven to 400°F (200°C). While the oven warms up, line your baking sheet with parchment paper. This not only prevents sticking but also makes for easier cleanup. Trust me, you’ll be glad you did when the time comes to enjoy your creepy creations!
Assemble the ghost mini pizzas
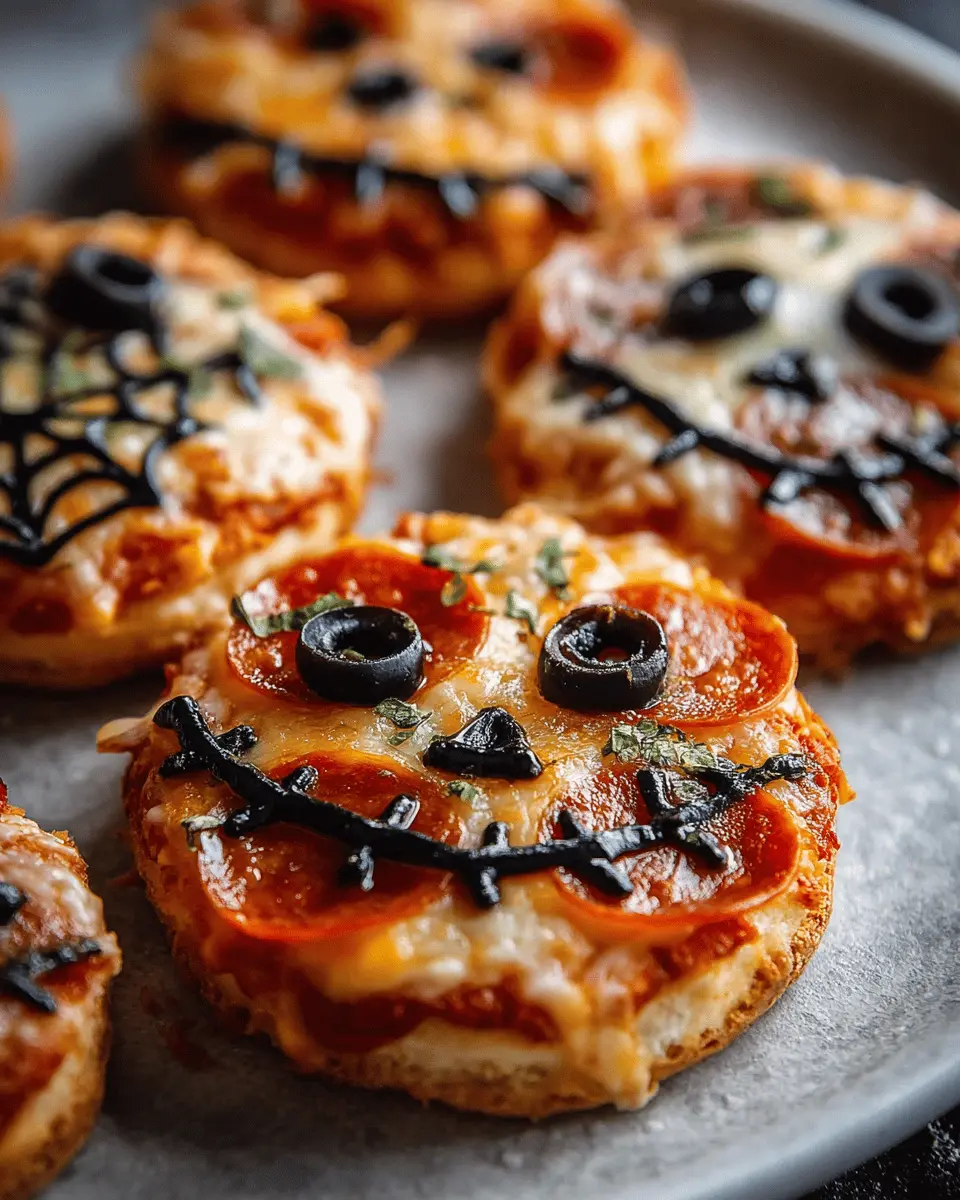
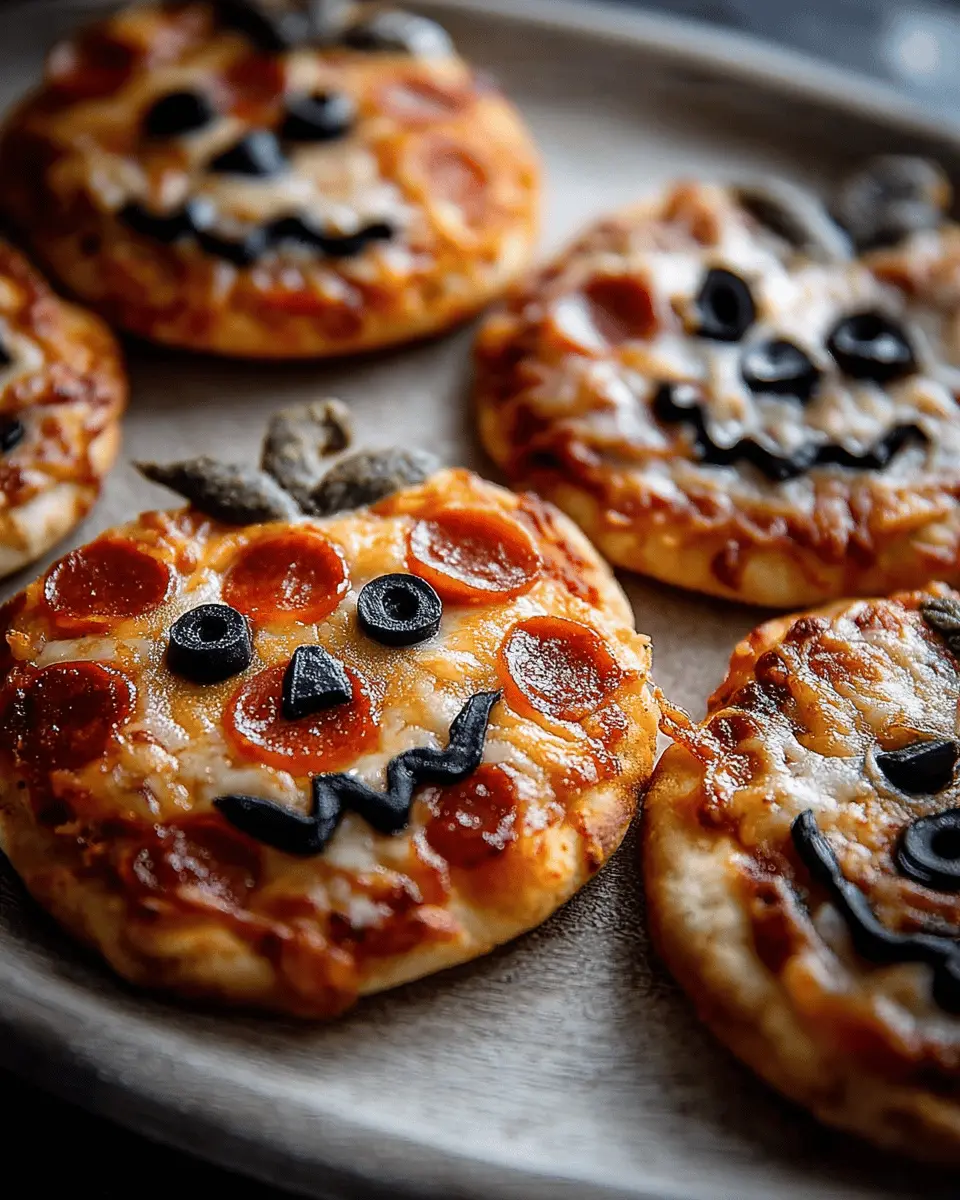
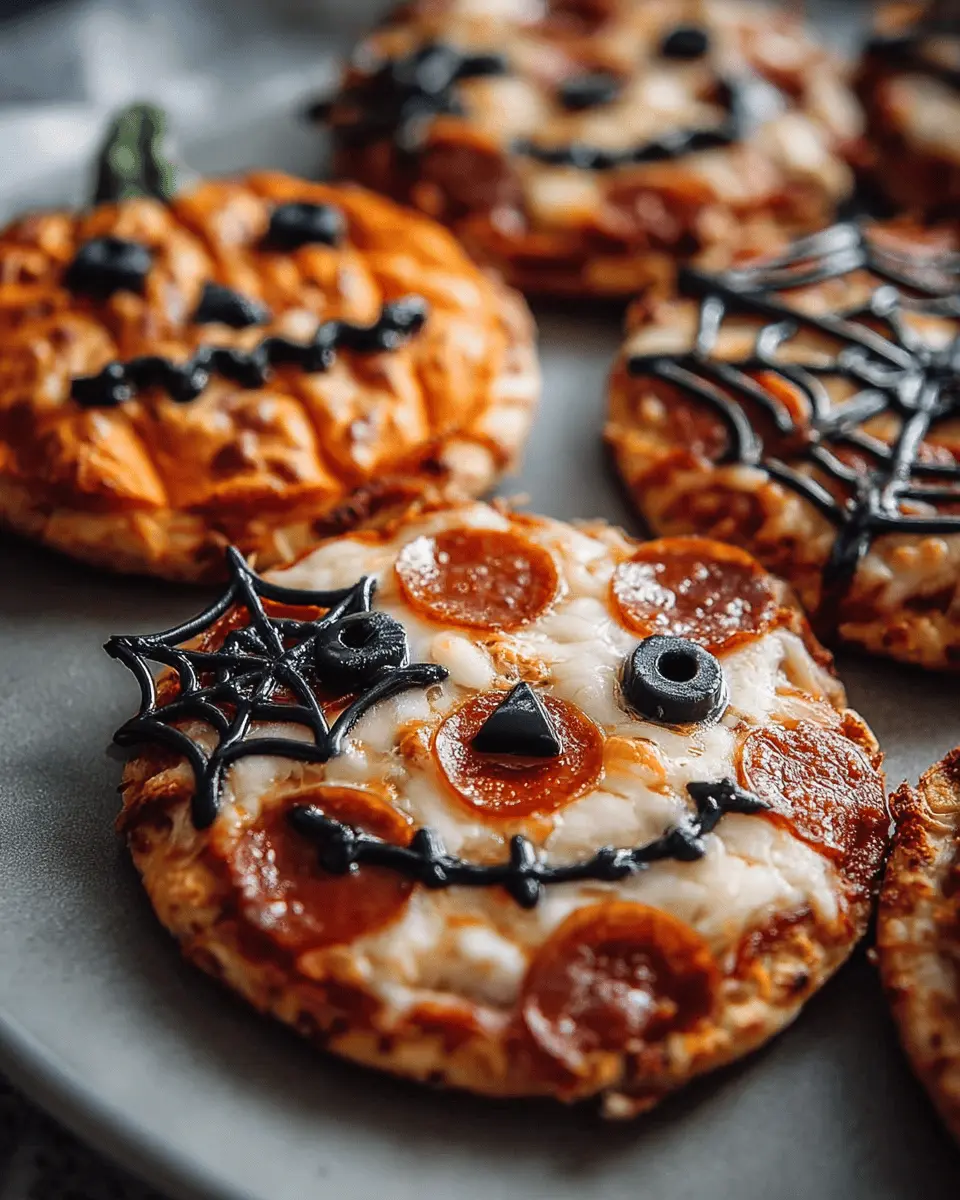
For the first frightful design, let’s create some ghost mini pizzas! Place your mini crusts on the baking sheet and slather on a generous spoonful of pizza sauce. Next, take your mozzarella cheese slices and cut them into whimsical ghost shapes. Arrange these playful ghosts on top of the sauce for a frightful touch. Don’t forget to slice small circles from your black olive for spooky eyes – it’s simple details like these that elevate your Halloween Mini Pizzas!
Create the mummy mini pizzas
Next up are the mummy mini pizzas. Using strips of mozzarella cheese, layer them over your sauce in a criss-cross pattern to give a wrapped effect. Add a couple of olive slices on top for those piercing mummy eyes. This design not only looks adorable but also adds an extra cheesy layer of flavor!
Decorate the jack-o’-lantern mini pizzas
Now, let’s carve out some fun with jack-o’-lantern pizza faces! After adding sauce to your crust, sprinkle a good amount of shredded mozzarella cheese. Use your cut-out orange bell pepper pieces to create smiling or spooky faces. When your guests see these mini masterpieces, they won't be able to resist!
Bake until golden and delicious
It’s time to let the oven work its magic! Bake your Halloween Mini Pizzas for about 8-10 minutes, or until the cheese is melted and the crust is golden brown. Keep an eye on them, as ovens can vary. Once done, take them out, let them cool for a moment, and get ready to share these delightful treats.
Enjoy serving these delicious, fun-classic mini pizzas at your Halloween gathering! For more Halloween ideas, check out creative recipes on sites like Food Network or BBC Good Food. Happy haunting!
Variations on Halloween Mini Pizzas
Customize with your favorite toppings
One of the best parts about Halloween Mini Pizzas is their versatility! Feel free to mix and match your favorite toppings for a personalized touch. Craving some spice? Add jalapeños or a drizzle of hot sauce. Want to keep it classic? Try extra cheese or a mix of veggies like mushrooms and spinach. You could even go with turkey bacon for a savory twist! The options are endless, making this dish a fun and creative way to celebrate the season.
Explore other spooky shapes
Get creative with shapes! Beyond ghosts and pumpkins, use cookie cutters to transform the cheese or veggies into bats, spiders, or even skulls. You can find various shaped cutters online or at craft stores, perfect for adding a spooky flair. Children will love experimenting while helping in the kitchen—turning meal prep into a joyful Halloween activity. Just imagine a platter of Halloween Mini Pizzas shaped like spooky creatures, inviting everyone to dig right in!
Cooking Tips and Notes for Halloween Mini Pizzas
Making Halloween Mini Pizzas is a delightful and engaging way to celebrate the spooky season! Here are some helpful tips to elevate your pizza-making experience:
-
Get Creative with Toppings: Feel free to experiment with toppings! Try adding chicken ham, turkey bacon, or colorful veggies to create unique designs. This can keep things fun and exciting for everyone involved.
-
Make It a Family Activity: Involve friends or family members in assembling the pizzas. Kids especially love using cookie cutters for shaping cheese or veggies. This turns cooking into a memorable experience!
-
Timing is Key: Keep an eye on your pizzas as they bake. Ovens can vary in temperature, so remove them when the cheese is bubbly and the crust is golden brown for the best result.
For handy tips on cooking with kids, check out resources from PBS Kids or Food Network. Happy Halloween!
Serving Suggestions for Halloween Mini Pizzas
When it comes to serving your Halloween Mini Pizzas, creativity is key! These delightful bites are perfect for gatherings, Halloween parties, or a fun family dinner. Here are some eye-catching serving ideas to make your spooky treat stand out:
-
Themed Plates: Use Halloween-themed plates or serving trays to add a festive touch. Look for cute designs featuring pumpkins or ghosts.
-
Dips and Sauces: Offer a variety of dipping sauces like ranch or garlic butter to enhance your pizza experience. These can make for a fun mix-and-match moment during your gathering.
-
Fun Accompaniments: Pair your Halloween Mini Pizzas with a colorful salad or roasted veggies for a balanced meal. For drinks, consider festive non-alcoholic options like sparkling cider or bright orange soda to keep the Halloween spirit alive!
These touches will not only make your meal more enjoyable but will also get your guests talking. Happy serving!
Time Breakdown for Making Halloween Mini Pizzas
Preparation Time
The preparation for these Halloween Mini Pizzas takes about 15 minutes. This includes gathering your ingredients, preheating the oven, and assembling your spooky toppings. With the excitement of creating fun shapes and combinations, this is the perfect time to include kids or friends!
Cooking Time
Once your pizzas are prepped, they’ll need about 8-10 minutes in the oven. Keep an eye on them as they bake—your goal is bubbling cheese and golden crusts.
Total Time
In total, you’ll need around 25-30 minutes to create and enjoy these delicious treats. With such a quick turnaround, you'll have plenty of time left for other Halloween festivities. So grab your ingredients, and let’s get cooking! If you're looking for more Halloween ideas, check out this fun Halloween treat guide for inspiration.
Nutritional Facts for Halloween Mini Pizzas
Calories
These delightful Halloween Mini Pizzas pack about 200 calories each, making them a fun, yet manageable treat for your Halloween festivities.
Protein
Loaded with protein, each mini pizza contains approximately 10 grams, thanks to the mozzarella cheese and any protein toppings like turkey bacon or chicken ham you decide to add.
Sodium
While delicious, be mindful of sodium. Each mini pizza has around 400 mg of sodium, primarily from the cheese and pizza sauce. Consider choosing low-sodium options for a healthier twist.
For more on the nutritional benefits of your pizza ingredients, check out sources like the USDA FoodData Central or Healthline. Enjoy your spooky creations while balancing flavor and nutrition!
FAQ about Halloween Mini Pizzas
Can I use different sauces for Halloween mini pizzas?
Absolutely! While the classic pizza sauce adds a delicious base, feel free to get creative. Pesto offers a fresh herbaceous flavor, barbecue sauce provides a sweet and tangy twist, or even Alfredo sauce can add a creamy richness. Just think about how the sauce complements your toppings!
Are these pizzas kid-friendly?
You bet! Halloween mini pizzas are not only delicious but also fun for kids to decorate. Let them help create spooky shapes using their favorite toppings. They can even personalize their pizzas with unique faces and designs, making it a fantastic family activity.
How can I store leftovers?
If you have any leftover mini pizzas, store them in an airtight container in the refrigerator. They’ll stay good for up to three days. When you’re ready to enjoy them again, simply reheat in the oven for a few minutes to get that crispy crust back. For more detailed tips, check out this storage guide.
Conclusion on Halloween Mini Pizzas
Halloween Mini Pizzas are not just delightful treats but also a canvas for creativity. Enjoy assembling these tasty bites with friends or family, making it a festive activity. Embrace the spirit of Halloween by personalizing your pizzas with your favorite toppings, and don't forget to share your spooky snacks online!

Halloween Mini Pizzas: Easy and Spooky Treats for Everyone
Equipment
- Baking sheet
- Parchment paper
- Small knife
- cutting board
- Oven
Ingredients
- 8 mini pizza crusts store-bought or homemade
- 1 cup pizza sauce
- 2 cups shredded mozzarella cheese
- 8 slices mozzarella cheese for ghost shapes
- 12 slices pepperoni
- 1 small black olive sliced for eyes
- 1 orange bell pepper cut into pumpkin shapes
Instructions
- Preheat oven to 400°F (200°C). Line a baking sheet with parchment paper.
- Place mini pizza crusts on the prepared baking sheet. Spread pizza sauce evenly over each crust.
- For ghost pizzas: cut ghost shapes from mozzarella slices and place on top of sauce. Add olive pieces for eyes.
- For mummy pizzas: layer strips of mozzarella cheese over sauce in a criss-cross pattern. Add olive slices for eyes.
- For jack-o’-lantern pizzas: top with shredded cheese and arrange bell pepper slices into pumpkin faces.
- Bake for 8-10 minutes or until cheese is melted and crust is golden.
- Serve warm and enjoy your spooky Halloween treat!


Leave a Reply