
Introduction to Honey Garlic Chicken
Honey garlic chicken is more than just a delicious meal; it's a simple solution for busy weeknights when you crave something satisfying and flavorful. This dish perfectly balances sweet and savory, thanks to the harmonious blend of honey and garlic, making it a family favorite. It’s versatile, too; you can easily customize it with vegetables or serve it over rice or noodles, ensuring there's something for everyone at the table.
Why is honey garlic chicken such a go-to for homemade meals? For starters, it requires minimal ingredients, many of which you likely have on hand, making it a budget-friendly option. Plus, it only takes about 30 minutes from start to finish! This means you can whip up a delightful dinner without spending hours in the kitchen.
According to food experts, the simplicity of the recipe enables even novice cooks to create a meal that tastes like it came from a restaurant. As you simmer the sauce, the aroma fills your kitchen, making it almost irresistible. So get ready to impress your friends and family with this flavorful dish that’s as fun to make as it is to eat!
Ingredients for Honey Garlic Chicken
Essential components for the dish
Creating honey garlic chicken starts with the right essentials for a well-balanced dish. Here’s a quick list of the must-have ingredients:
- Chicken: 2 large boneless, skinless chicken breasts provide the perfect protein base.
- Salt & Pepper: Simple seasonings to enhance flavor.
- Flour: ½ cup of all-purpose flour helps create a crispy crust.
- Peanut Oil: Use 3-4 tablespoons for frying (olive oil works as a substitute).
- Broths: ¾ cup each of beef and chicken broth adds depth to the sauce.
- Soy Sauce & Honey: A delightful combination of ¼ cup soy sauce and ⅓ cup honey contributes to that signature sweet and savory flavor.
- Garlic: 5 minced cloves bring aromatic goodness to the dish.
Optional ingredients for personalization
Feel free to tweak your honey garlic chicken recipe to suit your taste. Here are some optional ingredients you can add:
- Vegetables: Mix in sliced red bell pepper or 2 cups of broccoli florets for color and nutrition.
- Spices & Sauces: Consider a teaspoon of hot sauce for a spicy kick or ½ teaspoon of ground ginger for a touch of warmth.
- Cornstarch: ¼ cup to thicken your sauce perfectly.
- Extra Vegetables: Carrots, celery, or snow peas can enhance the dish's texture. Each addition can turn this meal into a comforting stir-fry masterpiece.
Experimenting with these elements allows you to make this dish uniquely yours! For more tips and tricks, check out The Cozy Cook.
Preparing Honey Garlic Chicken
Making honey garlic chicken at home is not just a rewarding experience but also a delicious way to impress your friends and family! Let’s walk through the steps to bring this dish from your kitchen to your dinner table.
Step 1: Prepare the Sauce
The heart of our honey garlic chicken lies in its sauce. Start by combining the sauce ingredients in a bowl—this includes ¾ cup each of beef and chicken broth, ¼ cup soy sauce, ⅓ cup honey, 1 teaspoon hot sauce, and all the garlic, vinegar, ginger, sesame oil, brown sugar, and red pepper flakes. Mix them well until everything is fully blended. This blend creates a balance of sweet and savory goodness that will elevate your chicken.
Step 2: Prepare the Chicken
Next, let’s prep the chicken. If you're working with two large boneless, skinless chicken breasts, slice them in half lengthwise to create thinner pieces. This helps them cook more evenly and allows for faster preparation. Cover them with plastic wrap and gently pound them to about ½ inch thick using the flat side of a meat mallet. After that, pat the chicken dry and season both sides with salt and pepper. Dredge each piece in all-purpose flour, tapping off any excess. This will give you that delightful, crispy exterior when seared.
Step 3: Sear the Chicken
In a large skillet, heat 3-4 tablespoons of peanut oil (or olive oil) over medium-high heat. Once sizzling, add your chicken, cooking in batches for 4-5 minutes on each side until you achieve a golden-perfect crust. Don’t crowd the skillet; this is key to those perfect sear marks! Once cooked, let the chicken rest on a plate while you prep the sauce.
Step 4: Create the Sauce in the Skillet
After the chicken is done, wipe out excess oil from the pan while keeping those flavorful bits—this is called “fond.” It adds layers of flavor to your sauce! Pour your previously combined sauce mixture into the skillet, and add the chopped veggies (like red bell pepper and broccoli). Cook over medium heat for about 3-4 minutes until the veggies soften.
Step 5: Combine and Heat the Chicken with Sauce
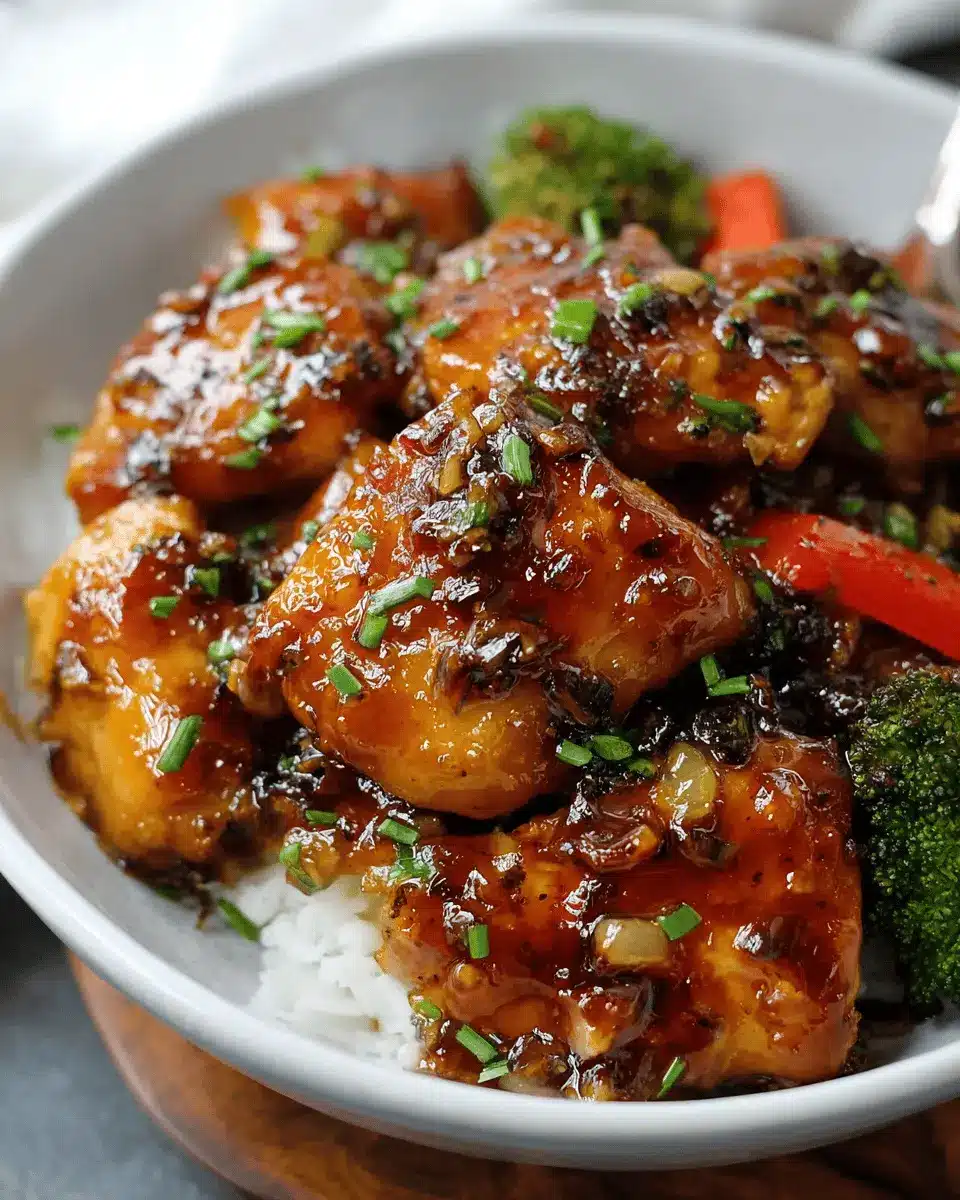
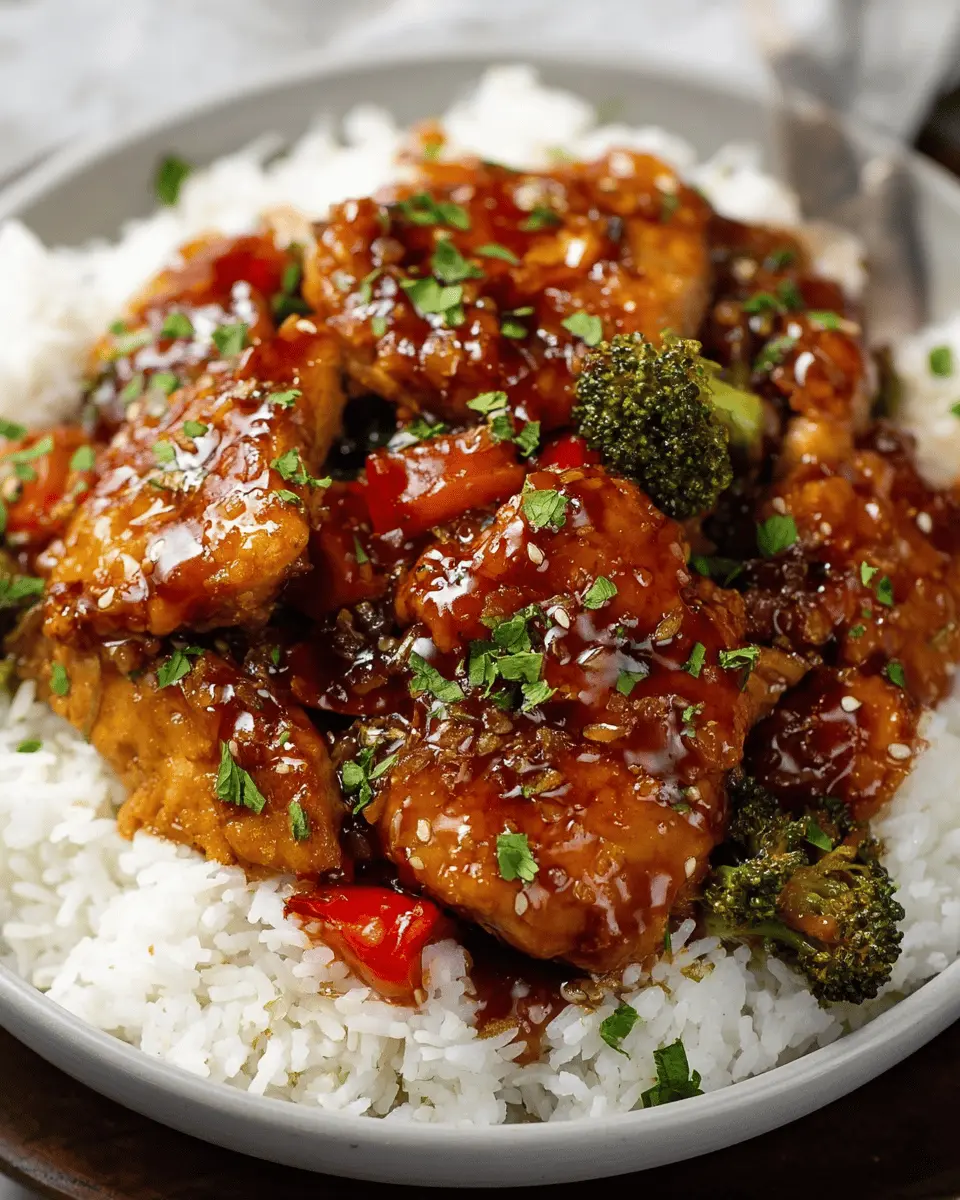
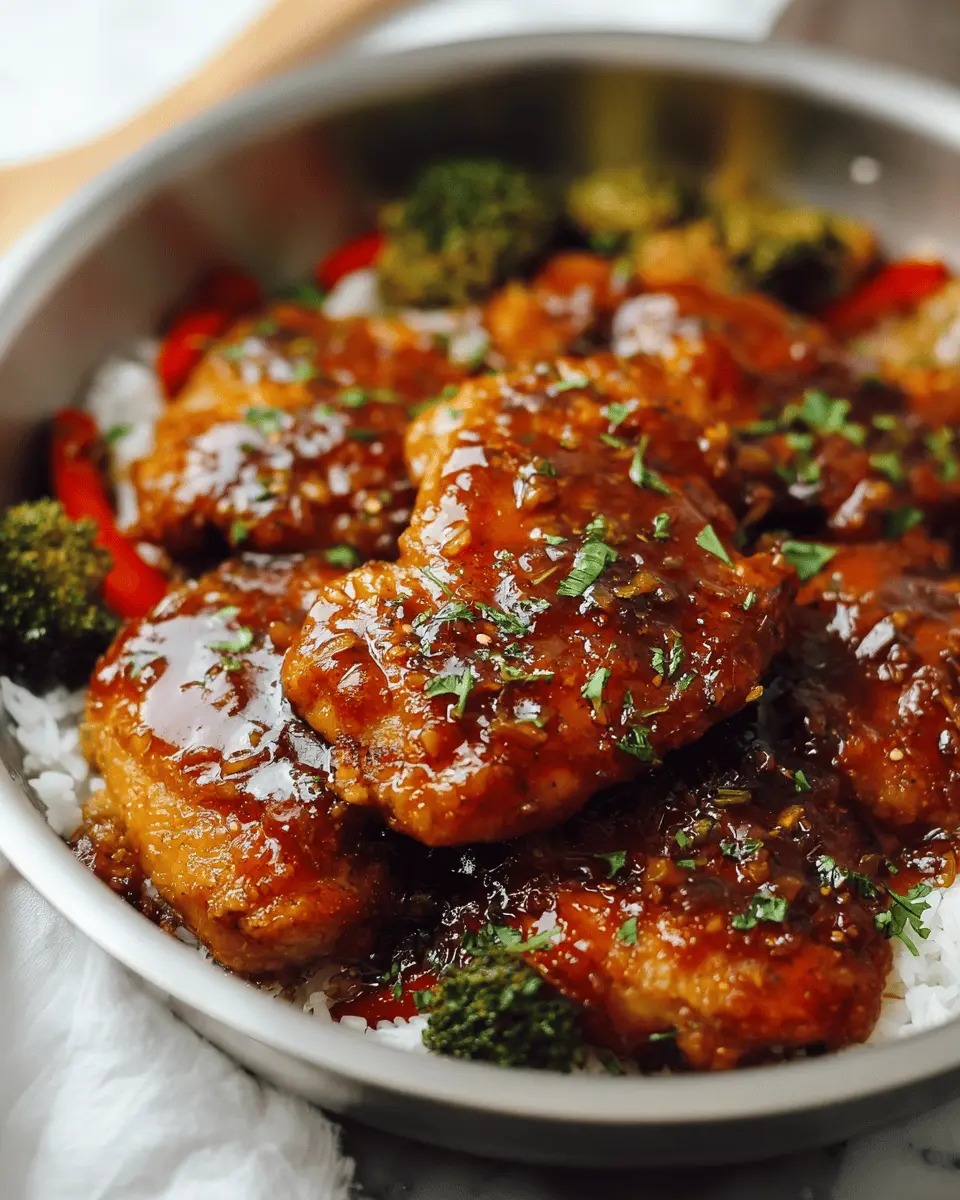
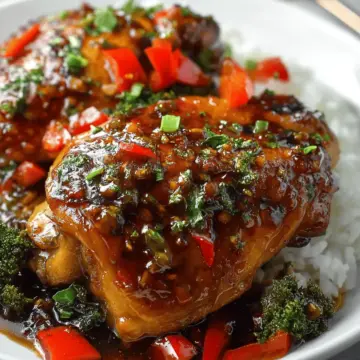
Bring the sauce to a gentle boil! To thicken the sauce, combine ¼ cup cornstarch with ¼ cup of cold water and stir until smooth. Slowly whisk this mixture into the boiling sauce, continuously stirring, until you reach your desired consistency. Reduce the heat to low, and return the chicken to the skillet, spooning the sauce over it. Let everything heat through for about 5 minutes. This offers a final touch of flavor infusion! Serve your honey garlic chicken over a bed of cooked rice and garnish with green onions for an impressive presentation.
Now you're ready to dig into a dish that’s sure to please! Enjoy your creation and don’t hesitate to share your results or any adaptations you made; your friends will definitely want to know your secret!
Variations on Honey Garlic Chicken
Honey Garlic Chicken with Veggies
Make your honey garlic chicken even more nutritious by incorporating colorful vegetables. Bell peppers and broccoli are delicious options, but why stop there? Consider adding snow peas, spinach, or even julienned carrots for extra crunch and flavor. Not only will this elevate the dish's visual appeal, but it will also pack it with essential vitamins and minerals. The diverse textures contribute to a delightful eating experience, making dinner feel less like a chore and more like a gourmet feast!
Honey Garlic Chicken with Alternative Meats
Want to switch up your protein? This recipe lends itself perfectly to alternatives like turkey or chicken ham. Simply substitute the chicken breasts with slices of turkey breast or chicken ham for a similarly flavorful meal that keeps you within your dietary preferences. You could even explore using beef strips for a heartier take. Remember, the key is keeping the cooking times similar, so your dish remains juicy and tender. With these variations, your honey garlic chicken can transform from a classic to a versatile favorite in no time!
For more delightful ways to prepare chicken, check out these healthy chicken recipes that might inspire your next meal!
Cooking tips and notes for Honey Garlic Chicken
Tips for perfect sauce consistency
To achieve that luscious sauce consistency for your honey garlic chicken, be mindful of the cornstarch-water mixture. It’s key for thickening without clumping. Start by mixing it well and gradually add it to the sauce while stirring continuously. If you prefer a thinner sauce, feel free to add a splash of broth or water until you reach your desired thickness.
Recommended chicken and vegetable pairings
Enhance your honey garlic chicken experience by pairing it with complementary veggies. Broccoli and red bell peppers are fantastic choices, but don't shy away from trying snap peas, carrots, or even bok choy for added crunch and color. You can never go wrong by serving it over a bed of fluffy rice—it's the perfect way to soak up all that flavorful sauce!
Serving suggestions for Honey Garlic Chicken
Recommended sides for a complete meal
To round out your honey garlic chicken experience, consider pairing it with a few delightful sides:
- Steamed Jasmine rice: Its delicate flavor complements the sweet and savory notes of the chicken.
- Roasted or sautéed veggies: Carrots and snap peas add crunch and color.
- Simple salad: A refreshing cucumber or mixed greens salad drizzled with sesame dressing can offer a nice contrast.
For more flavor, why not try a side of vegetable fried rice?
Ways to elevate your plating
Plating can enhance the dining experience significantly! Try these tips for an appealing presentation:
- Layer skillfully: Place a mound of rice on the plate and arrange the chicken on top, letting some of that luscious sauce drizzle down the sides.
- Garnish generously: Scatter chopped green onions or sesame seeds over the dish for a pop of color and texture.
- Use vibrant dishes: Brightly colored plates can make your honey garlic chicken stand out even more.
Elevating your plating can transform a simple meal into an impressive treat!
Time details for Honey Garlic Chicken
Preparation time
Getting ready for your Honey Garlic Chicken dish takes about 15 minutes. This is when you'll gather your ingredients, chop your veggies, and prep the chicken.
Cooking time
Once you're set, cooking will take around 25 minutes. This includes searing the chicken to perfection and simmering the delicious sauce.
Total time
In total, you’ll need about 40 minutes to enjoy this scrumptious meal. Perfect for a weeknight dinner! For more helpful cooking times, check out these tips.
Nutritional Information for Honey Garlic Chicken
Calories
This flavorful honey garlic chicken comes in at about 435 calories per serving. When you add a side of rice, it bumps up the total to around 589 calories, making it a satisfying, hearty meal.
Protein
With approximately 17 grams of protein, this dish is a great way to fuel your day. The chicken itself is a lean source of protein, which supports muscle growth and overall health.
Sodium
Keep an eye on sodium levels, as this recipe contains 948 mg per serving. To reduce sodium intake, consider using low-sodium soy sauce or broth—small tweaks can make a big difference without sacrificing flavor!
For more details on nutritional values, you can check out resources like the USDA FoodData Central or the Nutritional Guidelines from the American Heart Association for additional guidance on healthy eating.
FAQs about Honey Garlic Chicken
Can I make Honey Garlic Chicken ahead of time?
Absolutely! Honey garlic chicken can be prepared in advance, making it a great choice for meal prep. When you’re ready to eat, just reheat it in a skillet over low heat until heated through. Store it in an airtight container in the refrigerator for up to three days, or freeze it for up to three months for longer storage options.
What can I substitute for honey?
If you need a honey alternative, consider using maple syrup, agave nectar, or even brown sugar dissolved in a bit of water. Each substitute offers its unique flavor, so feel free to adjust based on your taste preference.
Is it possible to make this recipe gluten-free?
Yes, you can easily make honey garlic chicken gluten-free! Swap out regular soy sauce for a gluten-free alternative, like tamari. Using gluten-free all-purpose flour for dredging will ensure the chicken is also celiac-friendly. Enjoy your delicious meal without worry!
For more tips on gluten-free cooking, check out this comprehensive guide.
Conclusion on Honey Garlic Chicken
In conclusion, Honey Garlic Chicken is a delightful dish that combines sweet and savory flavors in a way that's sure to please anyone at your dinner table. With its simple preparation and rich sauce, it's perfect for busy weeknights or special occasions. Give this recipe a try, and enjoy the deliciousness!
Honey Garlic Chicken
Equipment
- Skillet
Ingredients
Chicken
- 2 large boneless/skinless chicken breasts
- to taste Salt
- to taste Pepper
- ½ cup all-purpose flour
- 3-4 tablespoons peanut oil can substitute olive oil
Sauce
- ¾ cup beef broth
- ¾ cup chicken broth
- ¼ cup soy sauce
- ⅓ cup honey
- 1 teaspoon hot sauce
- 5 cloves garlic minced
- 2 tablespoons apple cider vinegar
- ½ teaspoon ground ginger
- 1 teaspoon toasted sesame oil
- ¼ cup packed brown sugar
- a pinch red pepper flakes
- ¼ cup cornstarch
- ¼ cup cold water
Veggies
- 1 red bell pepper
- 2 cups broccoli florets
For Serving
- 3 cups cooked rice any kind
- Green Onions
Instructions
Cooking Instructions
- Combine the sauce ingredients except for the cornstarch and set aside.
- Slice the chicken in half lengthwise to create 2-3 thinner slices. Cover with saran wrap and use the textured side of a meat mallet to pound it to ½ inch thick.
- Pat the chicken dry and season each side with salt and pepper. Dredge in flour mixture and tap off excess.
- Heat olive oil in a large skillet over medium-high heat. Sear the chicken in batches for 4-5 minutes per side, until a golden crust has developed. Set aside and let rest.
- Wipe excess oil from the pan but leave the chicken remnants. This is called 'fond' and it will give the sauce more flavor.
- Add the combined sauce mixture (minus the cornstarch) to the skillet. Add the vegetables and heat over medium heat for 3-4 minutes, until the broccoli and peppers are softened.
- Bring to a boil. Combine cornstarch with the cold water until well-combined.
- Slowly add the cornstarch mixture to the sauce, stirring continuously, until your desired thickness is obtained. Reduce heat to low.
- Add the chicken back and spoon the sauce on top. Let the chicken heat through for about 5 minutes. Serve with white rice or vegetable fried rice.


Leave a Reply