
Introduction to Okonomiyaki
What is Okonomiyaki and Why is it Loved?
Okonomiyaki is a delightful Japanese dish that translates to "grilled as you like it." This savory pancake is a beloved comfort food, celebrated for its versatility and rich flavors. Basically, it’s a simple batter filled with fresh ingredients, but what makes it special is how you can customize it with your favorite toppings. Whether you prefer shrimp, turkey bacon, or a medley of vegetables, there’s an option for everyone!
The charm of okonomiyaki lies in its communal dining experience. Often made on a hot griddle at home or at specialty okonomiyaki restaurants, it turns cooking into a fun and interactive activity. This dish not only satisfies your taste buds but also brings people together, creating a warm and enjoyable atmosphere.
If you’re excited to try your hand at this delicious recipe, you’re in the right place! The recipe can be as simple or intricate as you'd like, and you can easily find essential ingredients online, such as dashi and okonomiyaki sauce. So, gather your ingredients, roll up your sleeves, and let’s dive into the world of okonomiyaki!
Ingredients for Okonomiyaki
When preparing your recette okonomiyaki, gathering the right ingredients is key to achieving that authentic flavor. Here are the essential components you’ll need:
Essential ingredients for the batter
- Flour: About 200 g of all-purpose flour gives the structure to your pancake.
- Dashi or Water: Use 250 ml of dashi for a savory boost or fresh water if you’re in a pinch.
- Eggs: Two eggs will bind the mixture and add richness.
- Salt and Baking Powder: A teaspoon each contributes to the dough's flavor and fluffiness.
Fresh toppings and garnishes
The beauty of okonomiyaki lies in its variety of toppings! You'll need:
- Cabbage: 400 g, finely shredded for crunch.
- Scallions: 100 g, chopped for a fresh, aromatic touch.
- Pickled Ginger (Benishoga): A dash adds a zingy contrast to the savory flavors.
Suggested alternative proteins
Feel free to get creative! Instead of traditional pork, you can use:
- Turkey Bacon: For a leaner option.
- Chicken Ham: A lighter alternative that still packs flavor.
- Shrimp: 200 g of peeled shrimp is a delicious seafood option.
No matter what, okonomiyaki is all about making it your own, so don’t hesitate to experiment!
Step-by-step Preparation of Okonomiyaki
If you're ready to dive into the world of Japanese cuisine, then this recette okonomiyaki is for you! This savory pancake is not just a dish; it’s an experience filled with flavors and textures that come together beautifully. Let’s walk through the steps to make your very own okonomiyaki!
Gather and prepare your ingredients
Start by gathering all your ingredients to ensure a smooth cooking experience. Here’s what you’ll need:
-
For the batter:
-
200 g de farine
-
250 ml de dashi ou d'eau
-
2 œufs
-
1 cuillère à café de sel
-
1 cuillère à café de levure chimique
-
For the filling:
-
400 g de chou, finement émincé
-
100 g de ciboule, hachée
-
200 g de crevettes décortiquées ou de tranches de Turkey Bacon
-
Optionally, add some beni shoga (pickled ginger)
-
For the finishing touches:
-
Sauce okonomiyaki
-
Japanese mayonnaise
-
Aonori (seaweed powder)
-
Katsuobushi (dried bonito flakes)
Having everything laid out in front of you makes it easier to follow along!
Mix the dry ingredients for the batter
In a large mixing bowl, combine the flour, salt, and baking powder. This dry mixture forms the base of your batter. Whisk these ingredients together until they are well-blended and fluffy. This step is essential because it ensures that your batter will rise nicely when cooked.
Combine the wet ingredients and create a smooth batter
Next, add in the dashi or water and crack in the eggs. Using a whisk, combine all of this until the batter reaches a smooth consistency. Don’t worry if there are a few small lumps; that’s normal! Your aim is to achieve a texture that will hold all those delicious fillings later on.
Fold in the vegetables and protein choices
Now comes the fun part! Gently fold in the shredded cabbage, green onions, and your choice of protein, either shrimps or Turkey Bacon. If you're feeling adventurous, throw in that optional pickled ginger, too! Make sure everything is coated with the batter. This helps the flavors meld together.
Cook the Okonomiyaki to perfection
Heat a non-stick skillet or a teppanyaki grill over medium heat, and add a drizzle of oil. Pour about a quarter of your batter mixture into the pan, forming a thick pancake about 1-2 inches high. Cook for about 5-7 minutes until the bottom is golden brown. Carefully flip and cook the other side for an additional 5-7 minutes. Remember, patience is key here—give it time to develop that crispy exterior!
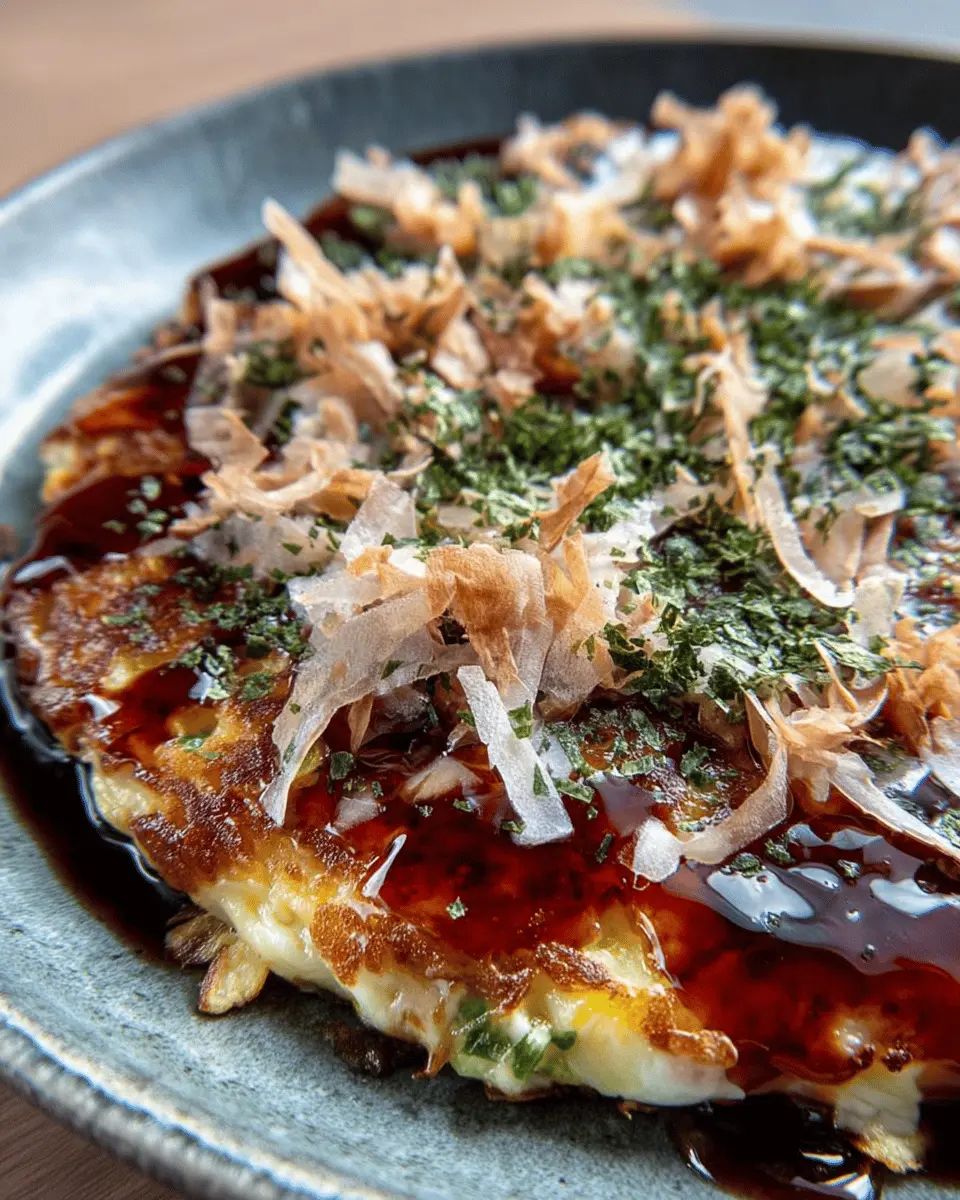
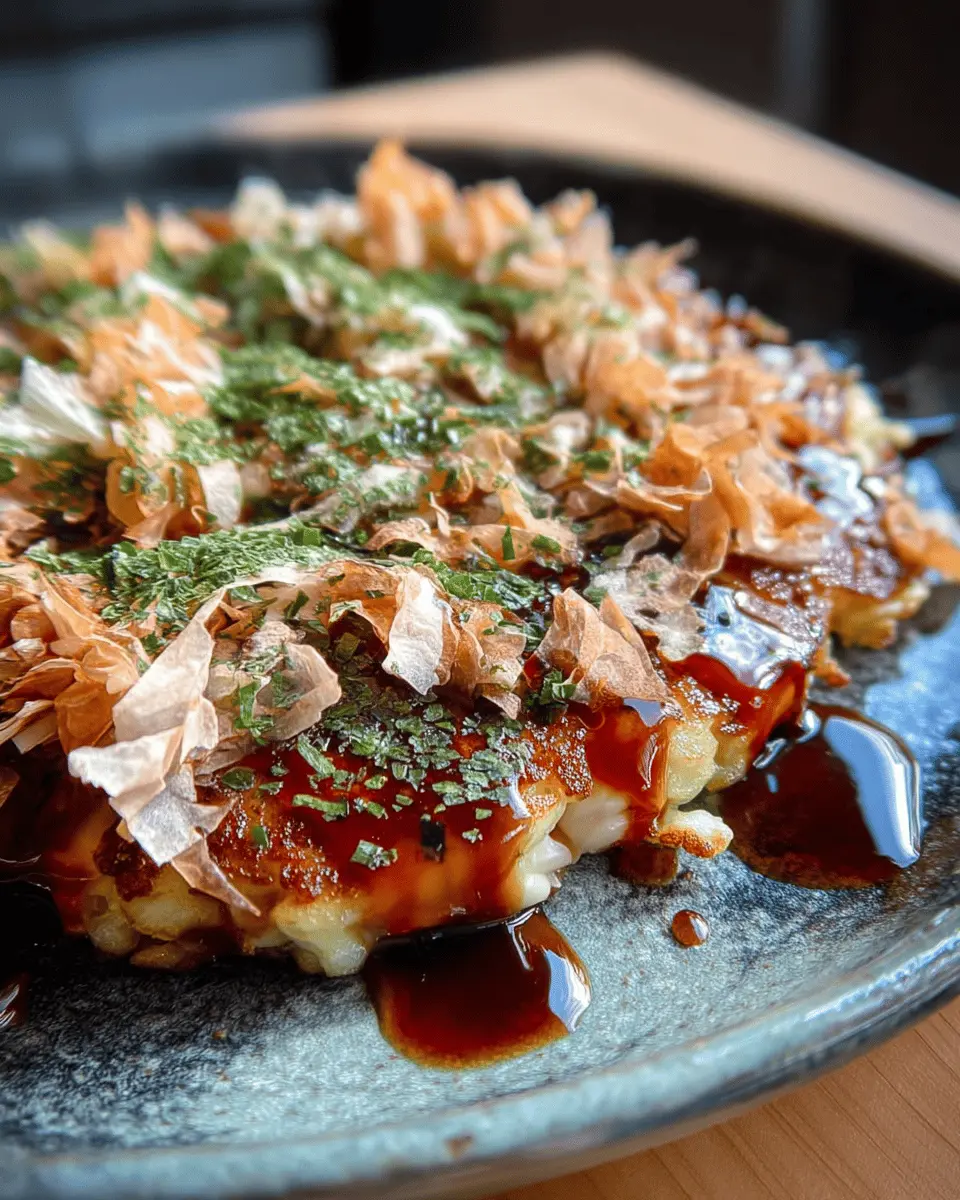
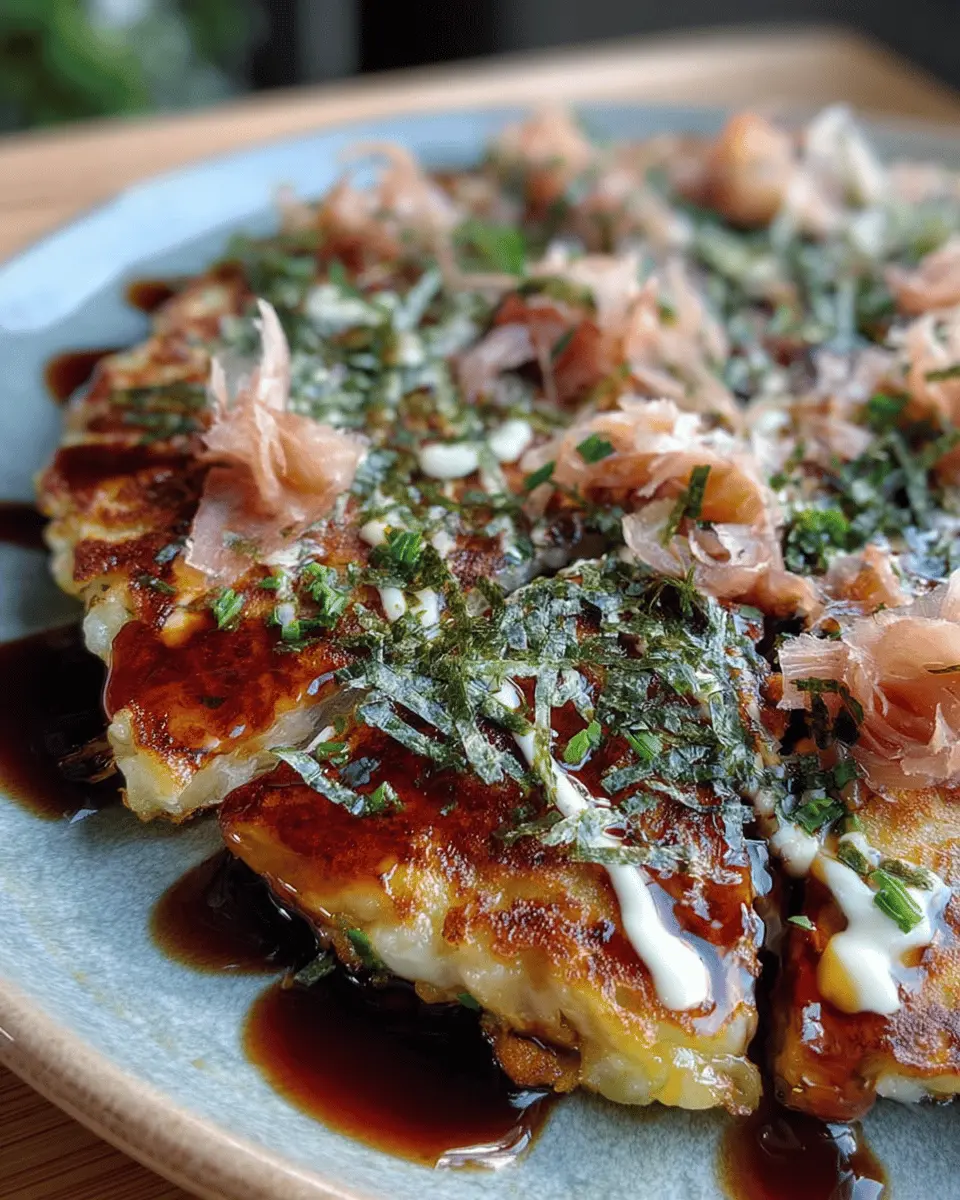
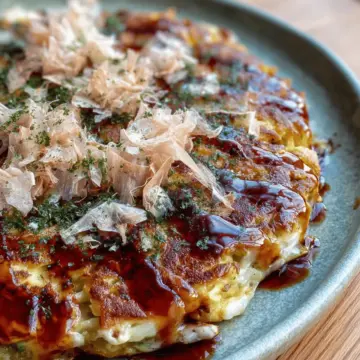
Finishing touches with sauce and garnishes
Once your okonomiyaki is cooked, transfer it to a plate and generously drizzle on the okonomiyaki sauce followed by zigzag patterns of Japanese mayonnaise. Sprinkle a bit of aonori and top with katsuobushi for an authentic touch. Repeat these steps for the remaining batter.
Serve these delicious pancakes hot, and enjoy every scrumptious bite! Itadakimasu!
Variations on Okonomiyaki
Vegetarian Okonomiyaki
For those who prefer a meatless option, vegetarian okonomiyaki is a delightful alternative. Simply omit the shrimp and turkey bacon, and load up on your favorite vegetables. Consider adding mushrooms, bell peppers, or even sweet potatoes for extra flavor and texture. Traditional toppings like okonomiyaki sauce and mayonnaise still work perfectly, bringing that umami punch to each bite. You can find a variety of vegetable-based recipes online to inspire your culinary creativity.
Seafood Okonomiyaki
If you’re a seafood lover, seafood okonomiyaki is the way to go. Swap out the turkey bacon for fresh seafood like squid or scallops. Blend these with raw shrimp for a seafood medley that's truly mouthwatering. This variation not only elevates the dish but also adds a delightful oceanic twist. A drizzle of seafood sauce alongside the traditional toppings will create an unforgettable experience. For more ideas on how to innovate your recette okonomiyaki, check out local Japanese cooking blogs or chef sites!
Cooking Tips and Notes for Okonomiyaki
Best cooking equipment for a crispy finish
To achieve that delightful crispy texture in your recette okonomiyaki, consider using a cast-iron skillet or a non-stick frying pan. A teppanyaki grill is also fantastic if you have one. Preheat your pan well and make sure to use enough oil to get those edges nice and golden. Don’t rush the cooking; patience will reward you with that perfect crunch!
Ingredient substitutes for dietary preferences
If you have dietary restrictions, don't worry! You can easily swap out ingredients in your recette okonomiyaki. For a gluten-free option, use rice flour or a gluten-free all-purpose blend instead of wheat flour. Those avoiding seafood can replace shrimp with chicken or even tofu. And if you're not keen on pork, turkey bacon makes for a leaner substitute. Embrace the versatility; okonomiyaki is all about enjoying it your way!
Serving Suggestions for Okonomiyaki
Side dishes that complement Okonomiyaki
To create a delightful meal around your recette okonomiyaki, consider pairing it with light and refreshing side dishes. Try:
- Miso Soup: A classic Japanese staple that balances the richness of okonomiyaki.
- Edamame: Steamed and lightly salted, these provide a healthy crunch.
- Pickled Vegetables: Tataki or tsukemono adds a tangy contrast, enhancing the flavor profile.
Creative plating ideas for a stunning presentation
Elevate your dining experience by presenting your okonomiyaki creatively. Here are some ideas:
- Serve on a rustic wooden board for a cozy feel.
- Garnish with vibrant microgreens alongside the okonomiyaki for a pop of color.
- Use a squiggle of mayonnaise and sauce for an artistic touch.
This thoughtful presentation not only makes your meal visually appealing but also showcases your culinary creativity!
Time Breakdown for Making Okonomiyaki
Preparation time
Gather your ingredients and mix the batter—it takes about 15 minutes to get everything ready for this delicious recette okonomiyaki.
Cooking time
Cooking each okonomiyaki will take around 10 to 14 minutes, depending on your heat level and thickness.
Total time
In total, you’re looking at about 25 to 30 minutes from start to finish, making this a quick and satisfying meal option!
By the way, if you're looking to learn more about the history and variations of okonomiyaki, check out this insightful article on Japanese cuisine. It adds a delightful context to your cooking experience!
Nutritional Facts for Okonomiyaki
Calories
Une portion d'okonomiyaki classique contient environ 250 à 350 calories, ce qui en fait un plat riche, mais qui peut être savouré avec modération dans le cadre d'une alimentation équilibrée.
Protein Content
Cette délicieuse recette okonomiyaki fournit également environ 10-15 g de protéines par portion, grâce aux œufs et aux garnitures comme les crevettes ou le turkey bacon. Parfait pour un regain d'énergie !
Sodium Levels
Attention aux niveaux de sodium ! Une portion peut contenir entre 600 et 800 mg, principalement en raison de la sauce okonomiyaki. Pour une option plus saine, envisagez d'utiliser moins de sauce ou de la remplacer par une version allégée.
Pour en savoir plus sur la nutrition dans les plats japonais, consultez des ressources comme NutritionData ou Healthline.
FAQs about Okonomiyaki
Can Okonomiyaki be made gluten-free?
Absolutely! To make a recette okonomiyaki gluten-free, simply substitute regular flour with a gluten-free blend or rice flour. Just ensure that the dashi or broth you use is also gluten-free. It's as versatile as it is delicious, so don’t hesitate to experiment with different flours.
What are the best sides to serve with Okonomiyaki?
Okonomiyaki is a delightful dish on its own, but pairing it with the right sides can elevate your meal. Consider serving:
- Miso soup for warmth and umami flavor.
- Pickled vegetables to add a refreshing crunch.
- Japanese rice as a simple, comforting side.
Each of these complements the savory pancake beautifully!
How can I store leftover Okonomiyaki?
If you find yourself with leftovers (a rare but happy occurrence), store them in an airtight container in the refrigerator. They should last up to 2-3 days. To reheat, pop them in a skillet on medium heat for a few minutes until warmed through. This keeps the outside crispy—a key part of any good recette okonomiyaki!
Conclusion on Okonomiyaki
Homemade okonomiyaki is a delightful fusion of flavors that's incredibly easy to create. With just a few fresh ingredients, you can craft this savory pancake that promises a mouthwatering experience. Whether it’s your first time or a wonderful repeat, this recette okonomiyaki is sure to impress friends and family alike. Enjoy!
Recette Okonomiyaki
Equipment
- Mixing Bowl
- non-stick skillet
- Spatula
Ingredients
For the batter
- 200 g flour
- 250 ml dashi or water Japanese broth
- 2 pieces eggs
- 1 teaspoon salt
- 1 teaspoon baking powder
For the filling
- 400 g cabbage finely shredded
- 100 g green onion chopped
- 200 g shrimp peeled or thin slices of pork
- 1 piece pickled ginger chopped, optional
- vegetable oil for cooking
For the finishing
- Okonomiyaki sauce or tonkatsu sauce
- Japanese mayonnaise
- aonori green seaweed powder
- katsuobushi dried bonito flakes
Instructions
Cooking Instructions
- In a large bowl, mix the flour, salt, and baking powder. Add the dashi or water and mix until a smooth batter forms.
- Incorporate the eggs and mix again until the batter is smooth.
- Add the shredded cabbage, green onion, shrimp (or pork), and pickled ginger into the batter. Mix well to coat all ingredients.
- Heat a non-stick skillet or teppanyaki plate over medium heat and add a little oil. Pour a portion of the batter (about a quarter) into the pan and shape it into a thick disc. Cook for about 5 to 7 minutes until the bottom is golden brown. Flip the okonomiyaki using a spatula and cook the other side for another 5 to 7 minutes.
- Transfer the okonomiyaki to a plate and generously drizzle with okonomiyaki sauce. Add Japanese mayonnaise in zigzag patterns.
- Sprinkle aonori and top with katsuobushi. Repeat the process for the remaining okonomiyaki. Serve immediately and enjoy hot. Itadakimasu!
Leave a Reply