
Introduction to Snowball Cookies
What are Snowball Cookies and why are they special?
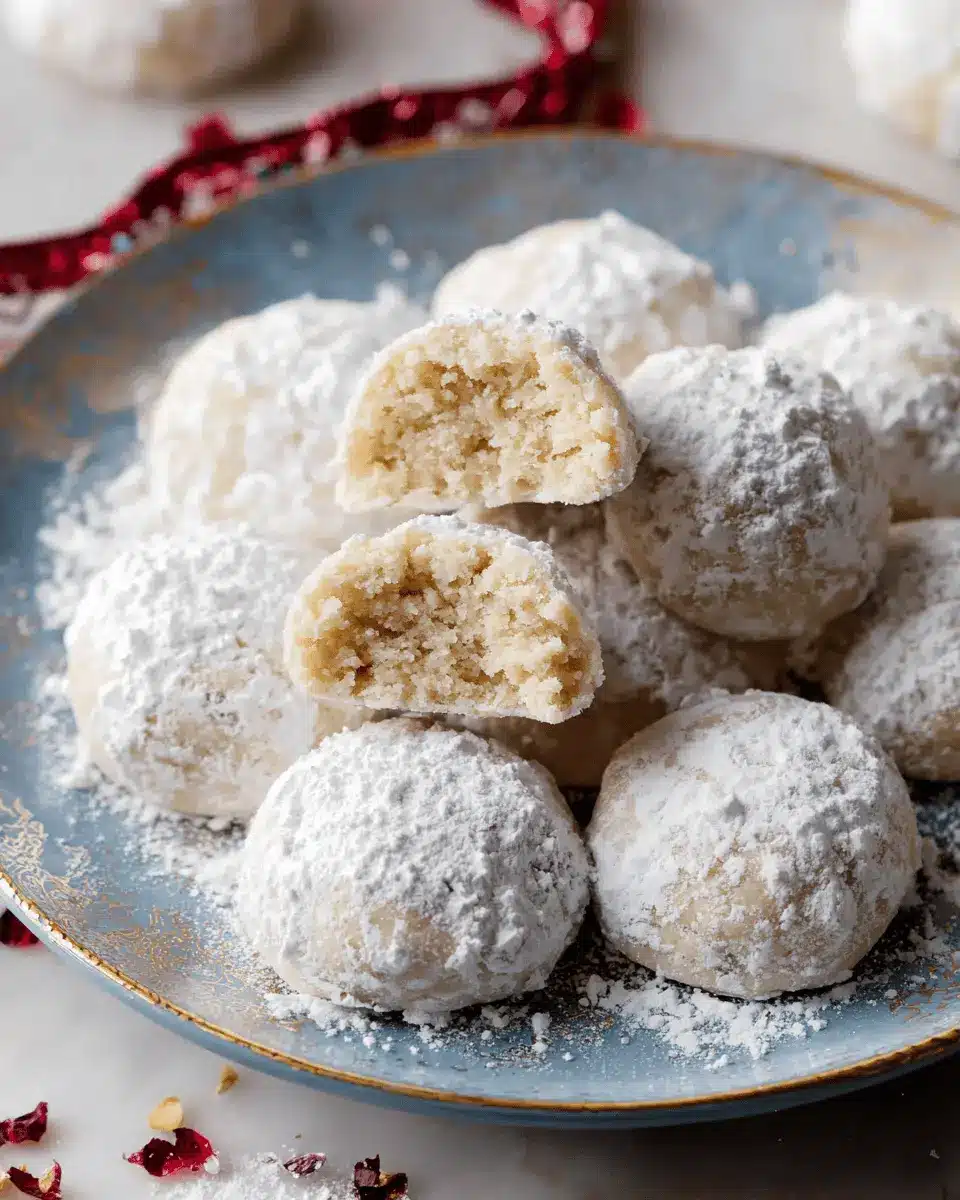
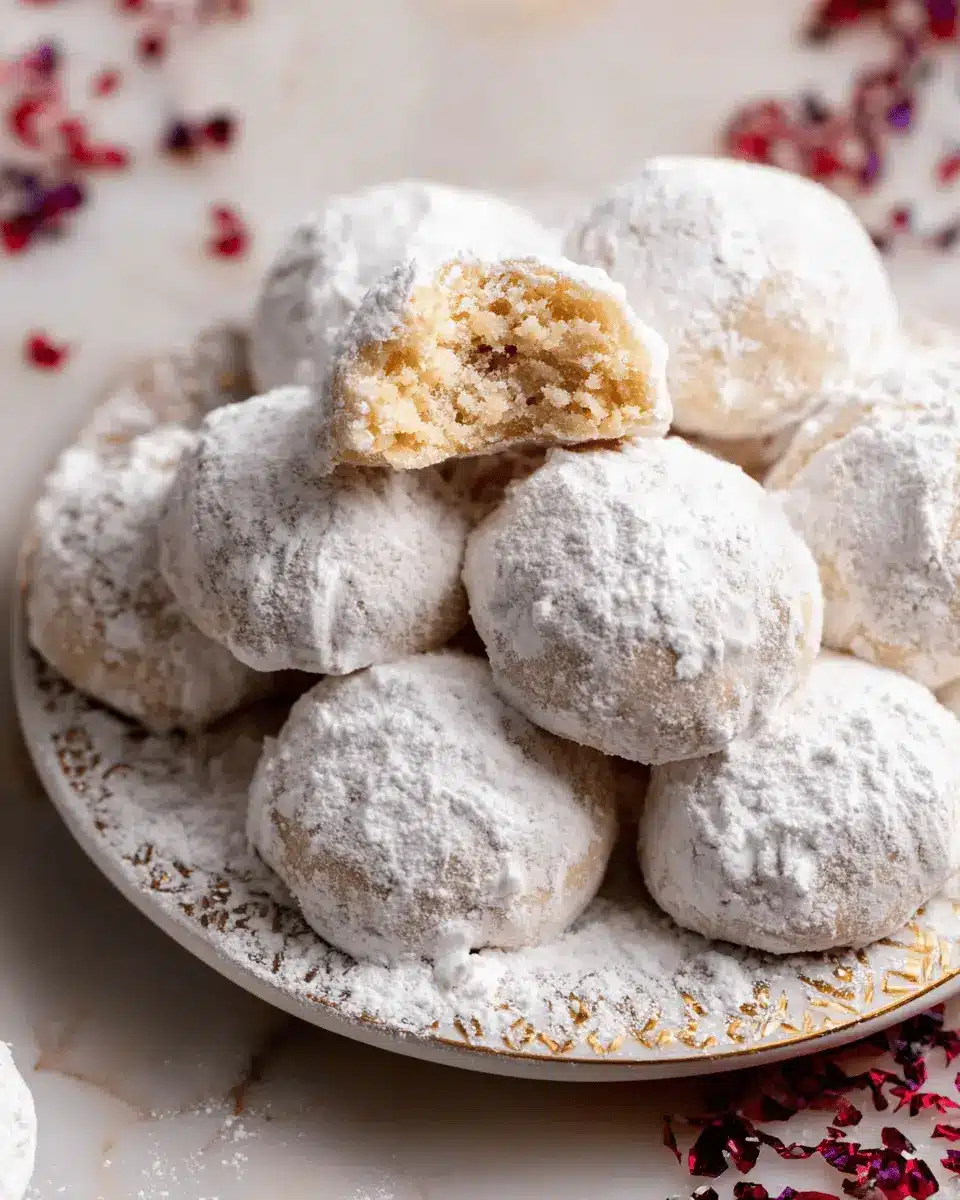
Snowball cookies, sometimes affectionately referred to as Russian tea cakes, are delightful little treats that bring a touch of nostalgia to any holiday gathering. With their tender, melt-in-your-mouth texture and light dusting of confectioners' sugar, these cookies are not just a feast for the eyes; they're a celebration of flavors and memories wrapped in a simple yet splendid package.
What makes snowball cookies truly special is their versatility. Traditional recipes incorporate finely chopped nuts—often pecans, which give a beautiful crunch and depth of flavor. But the beauty lies in their customization; you can swap in different nuts or even add a hint of chocolate or spices, making every batch uniquely yours.
Not only are these cookies a testament to the art of baking simplicity, but they also hold a special place in many family traditions. They often grace holiday cookie trays, symbolizing warmth and togetherness. So, whether you’re baking for a festive gathering or simply treating yourself, this Snowball Cookies Recipe is sure to become a beloved staple in your kitchen. Are you ready to create some sweet memories? Let’s dive into the recipe!
Ingredients for Snowball Cookies
Essential ingredients for the perfect batch
Creating delicious Snowball Cookies begins with a handful of essential ingredients that combine to deliver that melt-in-your-mouth texture we all love.
- 1 cup unsalted butter: For a perfectly creamy base, softened to room temperature.
- ¾ cup confectioners’ sugar: This sweet ingredient not only sweetens the dough but also adds a delightful lightness.
- 2 teaspoons pure vanilla extract: The soul of any good cookie, lending warmth and depth to the flavor.
- 2 and ¼ cups all-purpose flour: The backbone of the cookie structure—be sure to spoon and level it for accuracy.
- ⅛ teaspoon salt: A small but mighty component that enhances all the flavors.
Optional ingredients for added flavor
Want to elevate your Snowball Cookies Recipe even further? Consider these optional ingredients:
- ¾ cup finely chopped and toasted pecans: These add a rich, nutty flavor and a delightful crunch. Toasting enhances their depth—here’s a quick guide on how to toast nuts.
Feel free to experiment by adding other flavors or nuts based on your preference. What’s your favorite twist on an old classic?
Step-by-step Preparation of Snowball Cookies
If you're looking for a delicious treat that easily becomes a favorite during the holidays, you’ve stumbled upon the right recipe! This Snowball Cookies Recipe combines buttery goodness with that delightful sweetness, making it perfect for gifting or enjoying with a cup of coffee. Let’s dive into the easy steps together!
Preparing the dough
Start by gathering your ingredients—a thing of beauty if you appreciate the nuances of baking! In a large mixing bowl, use either a handheld or stand mixer to beat 1 cup of softened unsalted butter for about one minute until it’s smooth and creamy. Next, blend in ¾ cup of confectioners’ sugar until it’s incorporated and creamy. Don’t forget to scrape down the sides of the bowl. Add in 2 teaspoons of pure vanilla extract, and mix at medium-high speed. Now for the fun part: switch to low speed and gradually add in 2 and ¼ cups of all-purpose flour along with ⅛ teaspoon of salt. Your dough will seem a bit dry at first, but trust the process—just turn up the speed to high, and watch it come together beautifully! If you like, incorporate ¾ cup of finely chopped and toasted pecans for that extra crunch.
Chilling the cookie dough
Once your dough is ready, cover it tightly with plastic wrap. It’s time for a little rest in the refrigerator! Chill it for at least 30 minutes, but you can go up to 3 days if needed. Just remember, if you do chill it for an extended period, let it warm up at room temperature for 30 minutes before rolling; it can be quite stiff otherwise.
Shaping the cookies
Preheat your oven to 350°F (177°C) and line two baking sheets with parchment paper or silicone mats. Get a shallow bowl ready with the remaining confectioners’ sugar for coating. Scoop out 1 tablespoon of dough for each cookie and roll it into a smooth ball. Place them on your baking sheets, ensuring they’re at least 2 inches apart.
Baking the cookies
Slide those beautiful trays into the oven and bake until the cookies are just slightly golden on the edges, around 15 minutes. The smell wafting through your kitchen will be heavenly!
Coating the cookies
After removing the cookies from the oven, allow them to cool on the baking sheet for about five minutes. Then, gently roll them in the confectioners’ sugar to coat. Transfer the cookies to a wire rack to cool completely, and for an extra sweet touch, roll them in the sugar again once they’ve cooled. This is where they really become the snowballs you're after!
And there you have it! Now you can enjoy some delightful snowball cookies, or package them nice and pretty to share with friends and family. Happy baking!
Variations on Snowball Cookies
Adding Different Nuts
One of the best parts about making Snowball Cookies is that you can easily adapt the recipe to fit your taste! Instead of pecans, try swapping in walnuts, almonds, or even hazelnuts for a delightful twist. Each nut brings a unique flavor that can transform your cookies into something special. Finely chop and toast your nuts before mixing them in to enhance their nuttiness!
Flavor Enhancements with Spices or Extracts
Want to elevate your Snowball Cookies Recipe even further? Experiment with different spices and extracts! A dash of cinnamon or nutmeg can add warmth, while a splash of almond extract offers a lovely, fragrant twist. Don’t hesitate to get creative—these small changes can make a big impact on your cookies! For more flavor inspiration, check out resources like the American Spice Trade Association to explore which spices work well together!
Cooking Tips and Notes for Snowball Cookies
Make-ahead strategies
Snowball cookies are perfect for preparing in advance! You can chill the dough for up to three days in the fridge. Alternatively, roll the cookie dough into balls and freeze them for up to three months. This way, you can bake fresh cookies whenever the craving strikes. Just pop them in the oven directly from the freezer, adding an extra minute to the baking time.
Storage suggestions
Once baked, these delightful cookies can be stored in an airtight container for up to a week. If you want to maintain their snowy appearance, roll them in confectioners’ sugar again before serving. For a longer shelf life, consider freezing the cookies as well! Check out this guide on freezing cookies for the best tips.

Serving Suggestions for Snowball Cookies
Best pairings for showing off your cookies
When it comes to presenting your Snowball Cookies, think cozy and delightful. They pair beautifully with a steaming cup of coffee or tea, making for a perfect afternoon treat. Consider serving them alongside light snacks like fresh fruit, or even a scoop of vanilla ice cream for an indulgent twist. For a festive touch, how about arranging them on a colorful platter with some seasonal decorations?
Creative ways to present Snowball Cookies
Elevate your Snowball Cookies Recipe presentation by stacking them in clear glass jars or using decorative cupcake liners. You could even sprinkle some cocoa powder or a splash of edible glitter over them for an extra touch of charm. Personalizing each cookie stack with a fun note or ribbon can make them an inviting gift, perfect for sharing with friends during the holiday season or for housewarming parties!
For more on festive cookie gifts, check out this handy guide on cookie gifting ideas.
Time Breakdown for Snowball Cookies
Preparation time
Get ready to whip up these delightful Snowball Cookies in just 15 minutes. It's the perfect time to gather your ingredients and let your mixer do the hard work.
Baking time
Once you’ve rolled your cookie balls, they’ll need about 15 minutes in the oven. Keep an eye on them for that lovely golden hue!
Total time
In a little over 45 minutes, you’ll have a batch of scrumptious cookies ready to enjoy. Don’t forget to account for the chilling time if you plan to refrigerate the dough!
For more tips on chilling dough, check out this fantastic guide on the science of chilling cookie dough.
Nutritional Facts of Snowball Cookies
When indulging in these delightful Snowball Cookies, here are some key nutritional insights to consider:
- Calories: Each cookie contains approximately 120 calories, making them a sweet treat to enjoy in moderation.
- Sugars: With about 6 grams of sugar per cookie, these cookies satisfy your sweet tooth without being overly indulgent.
- Fats: The rich, buttery flavor comes from around 7 grams of fat, primarily from the unsalted butter, offering a melt-in-your-mouth experience.
For more details about the nutritional value of various baked goods, check out resources from well-known nutrition sites like NutritionData or Eat This Much.
These nutritional facts can help you enjoy your Snowball Cookies Recipe while keeping your health goals in mind!
FAQs about Snowball Cookies
How can I prevent my cookies from spreading?
To minimize spreading, chilling the dough is key. After mixing the ingredients for your Snowball Cookies Recipe, allow the dough to rest in the refrigerator for at least 30 minutes. This helps solidify the butter, keeping the cookies from flattening out while baking. If you notice excessive spreading even after chilling, consider adding a tablespoon more flour to the dough.
Can I freeze Snowball Cookies?
Absolutely! Snowball Cookies are fantastic for freezing. You can freeze both the baked cookies and the unbaked dough balls. For baked cookies, store them in an airtight container for up to three months. If you're freezing unbaked dough, just roll them into balls and place them on a baking sheet before freezing. Once solid, transfer them to a freezer bag and bake straight from the freezer for about an extra minute.
What’s the best way to store leftover cookies?
To keep your cookies fresh, store them in an airtight container at room temperature. They should stay tasty for about a week. If you want to maintain their melt-in-your-mouth magic, consider layering them with parchment paper to prevent sticking. For longer storage, revert to the freezing method mentioned above!
For more storage tips, check out this article for expert advice.
Conclusion on Snowball Cookies
Making Snowball Cookies at home is a delightful experience. These tender, buttery treats are perfect for sharing! Their melt-in-your-mouth texture and festive coating make them an ideal addition to any dessert table. Plus, with simple ingredients and straightforward steps in this Snowball Cookies Recipe, you’ll impress friends and family effortlessly!
Why You Should Try Making Snowball Cookies at Home
If you’re in search of a stress-free yet rewarding baking experience, look no further than these delightful cookies.
- Simplicity: With just a handful of ingredients, this recipe is perfect for beginners and seasoned bakers alike. You can whip these up in no time, making them ideal for spontaneous gatherings or holiday celebrations.
- Customization: Want to add a twist? Feel free to substitute the pecans with nuts of your choice or add chocolate chips for a more decadent treat.
- Fun for Everyone: Baking is a great activity to share with friends or family! Imagine the joy of rolling dough into little spheres and coating them in sugar.
Making Snowball Cookies is a delightful way to unleash your creativity in the kitchen, and sharing them will spread even more joy. Plus, if you want to store some for later, these cookies freeze beautifully, making them a versatile treat for any occasion.
So grab your ingredients and let the magic unfold! For more baking inspiration, check out Sally's Baking Addiction for tips on getting that room temperature butter just right or try out different cookie variations. Happy baking!

Snowball Cookies Recipe
Equipment
- Handheld mixer
- Stand Mixer
- Baking Sheets
- Silicone Baking Mats
- Parchment paper
- Glass Mixing Bowl
- Cooling Rack
Ingredients
Dough Ingredients
- 1 cup unsalted butter softened to room temperature
- ¾ cup confectioners’ sugar
- 2 teaspoons pure vanilla extract
- 2 ¼ cups all-purpose flour spooned & leveled
- ⅛ teaspoon salt adjust if using salted butter
- ¾ cup finely chopped and toasted pecans optional
Coating
- 1 ¼ cups confectioners’ sugar
Instructions
Making the Cookie Dough
- In a large bowl using a handheld mixer or stand mixer fitted with a paddle attachment, beat the butter for 1 minute on medium speed until completely smooth and creamy. Add ¾ cup confectioners’ sugar and beat on medium high speed until combined and creamy. Scrape down the sides and bottom of the bowl as needed. Next, beat in the vanilla extract on medium-high speed until combined.
- Switch to low speed and slowly add the flour and salt. The dough will look dry and you may not think the flour will fully combine. Once all of the flour is added, turn the mixer up to high speed. The dough will come together. Finally, beat in the chopped pecans, if using.
Chilling Cookie Dough
- Cover the cookie dough tightly and chill in the refrigerator for at least 30 minutes and up to 3 days.
- If chilling for 3+ hours, let the cookie dough sit at room temperature for at least 30 minutes before rolling into balls.
Baking Cookies
- Preheat oven to 350°F (177°C). Line 2 large baking sheets with parchment paper or silicone baking mats. Set aside.
- Scoop or roll 1 Tablespoon (20g) of cookie dough per cookie. Roll into a ball and place on the baking sheets, at least 2 inches apart. Bake the cookies until golden brown on the bottom edges and just barely browned on top, about 15 minutes.
Coating Cookies
- Allow the cookies to cool for 5 minutes on the baking sheet, then very gently roll them in the confectioners’ sugar to coat completely.
- Place the cookies on wire racks to cool completely. Once cooled, roll in confectioners’ sugar again for a second coating.
Leave a Reply